

Mini Mummy Pizzas aren’t just another Halloween snack they’re the answer to every parent’s October dilemma: how do you make something fun, spooky, and actually nutritious for trick-or-treaters and party guests? Last Halloween, I watched my niece’s eyes light up when I pulled these cheesy, bandaged beauties from the oven. She squealed, “Aunt Emeli, they have EYES!” and devoured three before I could even plate them properly.
I’m Emeli, and here at FoodFansy, I believe that cooking should be joyful, not stressful especially during the holidays. These Mini Mummy Pizzas deliver on all fronts: they’re incredibly easy to make, endlessly customizable, and turn even the pickiest eaters into enthusiastic mummy-unwrappers. Whether you’re hosting a Halloween bash, prepping party snacks for school, or just want to make a Tuesday night feel festive, this recipe has you covered.
In this guide, I’ll walk you through why these spooky pizzas work so well, how to choose the best bases and toppings, step-by-step assembly instructions, creative flavor variations, and answers to all your burning questions. Let’s get wrapped up in some Halloween fun!
Why This Mini Mummy Pizzas Recipe Works
These Mini Mummy Pizzas hit the sweet spot between festive creativity and practical weeknight cooking. Here’s what makes them so special:
- Kid-Approved & Adult-Loved: The playful mummy design gets kids excited about eating, while parents appreciate the sneaky veggie potential and real ingredients.
- Ready in Under 20 Minutes: From prep to plate, you’re looking at minimal time investment perfect for busy Halloween weeks when you’re juggling costumes, candy, and chaos.
- Budget-Friendly Ingredients: No specialty items required. Everything can be grabbed during your regular grocery run, with most ingredients costing just pennies per serving.
- Customizable for Every Diet: Gluten-free bases, dairy-free cheese, veggie-loaded, or protein-packed these pizzas adapt to whatever your crew needs.
- Party-Perfect Presentation: They look impressive but require zero artistic skill. The “messier” the bandages, the more authentic they look!
The magic happens when melty mozzarella creates those iconic mummy wraps, while the simplicity of the recipe means even young helpers can join the kitchen fun.
Choosing the Right Base for Mini Mummy Pizzas
Your pizza base sets the foundation for mummy success. Here’s how to pick the perfect option for your needs.
Best Bases for This Recipe
English Muffins: My personal favorite for their crispy edges and pocket-like texture. They hold sauce beautifully without getting soggy, and their size is perfect for little hands.
Mini Pizza Crusts: Pre-made mini crusts from the bakery section offer a more traditional pizza experience with that satisfying chew. Look for par-baked options that crisp up quickly.
Naan or Flatbread: These create a slightly softer, more pillowy mummy. Cut them into rounds or rectangles for different mummy shapes.
Pita Bread: Split pitas in half for ultra-thin, crispy mummies. They’re especially great for those who want more topping-to-crust ratio.
Buying Tips
When shopping for your bases, look for options that are firm and not overly soft they need to support toppings without drooping. Check expiration dates carefully, especially during busy Halloween weeks when stock might be sitting longer. For English muffins, go for the “fork-split” variety rather than pre-sliced; they create better texture and those characteristic nooks and crannies that cradle sauce perfectly.
Substitutions
Gluten-Free: Swap for gluten-free English muffins or cauliflower pizza crusts. Just note they may need 2-3 extra minutes of baking time.
Low-Carb: Use portobello mushroom caps or zucchini rounds as bases. Pat them very dry before adding toppings.
Homemade: If you have time, make your own mini pizza dough balls. It adds a personal touch and fills your kitchen with that irresistible yeasty aroma.
Ingredients & Prep for Mini Mummy Pizzas
Let me break down everything you need to bring these spooky pizzas to life.
Pizza Base Essentials
For the Bases:
- 4 mini pizza bases, English muffins (halved), or your preferred alternative
- 1 cup pizza sauce (store-bought or homemade marinara)
- 1 cup shredded mozzarella or 4-6 string cheese sticks
- 4-8 black olives or sliced black beans for eyes
Topping Options
Vegetable Add-Ins:
- ¼ cup diced bell peppers (red, yellow, or orange for color)
- ¼ cup sweet corn kernels
- ¼ cup sliced mushrooms
- ¼ cup fresh spinach, chopped
Protein Boosters (Optional):
- Cooked Italian sausage crumbles
- Pepperoni pieces tucked under the cheese
- Grilled chicken bits
Prep Essentials for Mini Mummy Pizzas
Before You Begin:
- Preheat your oven to 375°F (190°C). This temperature ensures the cheese melts beautifully without burning the edges.
- Prep your cheese strips: If using string cheese, peel it into thin strips this is actually a fun job for kids! If using shredded mozzarella, you can leave it as-is, though strips create more authentic-looking bandages.
- Slice your olives: Cut black olives into rounds or quarters, depending on how big you want those spooky eyes. Pat them dry with a paper towel so they don’t slide off.
- Line your baking sheet with parchment paper for easy cleanup and to prevent sticking.
- Gather toppings: Have everything within arm’s reach before you start assembling. Once you begin, the process moves quickly!

Step-by-Step Cooking Instructions for Mini Mummy Pizzas
Let’s transform these simple ingredients into Halloween magic.
Pre-Cooking Prep for Mini Mummy Pizzas
Start by arranging your halved English muffins or pizza bases on your parchment-lined baking sheet, cut side up. Using a spoon or small ladle, spread a thin layer of pizza sauce over each base about 2 tablespoons per mummy. Don’t overdo the sauce or it’ll make everything soggy. Think of it as a light coating, not a puddle.
If you’re adding any vegetables or proteins, now’s the time to sprinkle them on. Keep the toppings light and evenly distributed. Remember, you’re about to wrap these little guys in cheese bandages, so you don’t want too much bulk.
Cooking Method for Mini Mummy Pizzas
Place your sauce-covered bases on the baking tray, leaving a bit of space between each one for air circulation. Now comes the fun part creating the mummy wraps!
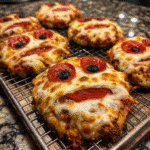
Take your cheese strips (or grab pinches of shredded mozzarella) and lay them across each pizza base in a crisscross pattern. Don’t worry about being perfect or neat mummies are ancient and wrapped haphazardly, so embrace the chaos! Leave a small gap near the top third of each pizza where you’ll place the eyes.
Once your cheese bandages are arranged, gently press two olive slices into the cheese gap to create the eyes. They should peek out from between the “bandages” for that classic mummy stare.
Slide the baking sheet into your preheated oven and bake for 10-12 minutes. You’re looking for the cheese to melt completely, get stretchy, and develop those gorgeous golden edges.
Doneness Check for Mini Mummy Pizzas
Your Mini Mummy Pizzas are ready when the cheese looks bubbly and has started to turn lightly golden at the edges. The cheese should be completely melted with no white, unmelted patches remaining. If your bases are English muffins, check that the edges have crisped up nicely they should be golden brown and slightly toasted.
If you’re using thicker bases or added extra toppings, you might need an additional 2-3 minutes. Keep a close eye during the final minutes to prevent burning.
Resting for Mini Mummy Pizzas
This step is crucial, especially if you’re serving these to eager kids! Remove the baking sheet from the oven and let the mummy pizzas rest for 2-3 minutes before serving. This brief cooling period allows the cheese to set slightly, preventing molten cheese burns and making them easier to pick up and eat.
The resting time also helps the cheese “glue” itself to the toppings, so everything stays together during that first enthusiastic bite.
Pro Tips for Perfect Mini Mummy Pizzas
After making dozens of batches for various Halloween gatherings, I’ve learned some tricks that elevate these from good to spectacular.
Avoiding Soggy Mini Mummy Pizzas
Toast Your Bases First: For extra insurance against sogginess, toast your English muffins or bases in the oven for 3-4 minutes before adding any toppings. This creates a moisture barrier.
Drain Wet Toppings: If you’re using jarred or canned vegetables, pat them thoroughly dry with paper towels. Moisture is the enemy of crispy pizza.
Sauce Sparingly: Less is more when it comes to pizza sauce. A thin layer provides flavor without waterlogging your base.
Tool Recommendations for Mini Mummy Pizzas
- Kitchen Scissors: Perfect for cutting string cheese into strips quickly and evenly
- Parchment Paper: Non-stick surface makes cleanup a breeze and prevents sticking
- Small Offset Spatula: Helps spread sauce evenly in those tight corners
- Pizza Cutter: Makes serving and cutting easier, especially if you’re making larger batches
Storage & Reheating for Mini Mummy Pizzas
Make-Ahead Option: Assemble the pizzas completely but don’t bake them. Cover tightly with plastic wrap and refrigerate for up to 24 hours. Bake directly from the fridge, adding 2-3 minutes to the cooking time.
Freezing: Freeze baked and cooled mummy pizzas in a single layer on a baking sheet, then transfer to a freezer bag. They’ll keep for up to 2 months. Reheat from frozen at 350°F for 8-10 minutes.
Reheating Leftovers: Pop them in a 350°F oven for 5-6 minutes to re-crisp. Avoid the microwave if possible it makes the bases chewy and the cheese rubbery.
Flavor Variations for Mini Mummy Pizzas
One of the joys of this recipe is how easily it adapts to different tastes and dietary needs. Let me share some of my favorite twists.
Spicy Mummy Mini Mummy Pizzas
Add a kick to these Halloween treats by mixing a teaspoon of red pepper flakes into your pizza sauce, or dot the sauce with small dollops of sriracha before adding cheese. For adults at your Halloween party, I love tucking sliced jalapeños under the cheese bandages. The heat combined with cooling mozzarella creates an addictive contrast that keeps people coming back for more.
Keto & Paleo Mini Mummy Pizzas
Replace traditional bases with grilled portobello mushroom caps or thick zucchini rounds. Use sugar-free pizza sauce (check labels many brands sneak sugar in) and top with full-fat mozzarella. For paleo, swap in dairy-free cheese alternatives made from nuts. These versions are surprisingly filling and just as festive as the original.
Global Flavors for Mini Mummy Pizzas
Mexican Mummies: Use salsa instead of pizza sauce, add black beans and corn, and top with pepper jack cheese. Serve with a side of guacamole for dipping.
Mediterranean Mummies: Spread hummus on the base instead of pizza sauce, add crumbled feta, cherry tomatoes, and olives, then use mozzarella strips for bandages.
BBQ Chicken Mummies: Brush bases with BBQ sauce, add shredded rotisserie chicken, red onions, and cheddar-mozzarella blend for a smoky twist.
Pesto Mummies: Swap pizza sauce for basil pesto, add sun-dried tomatoes and pine nuts, then wrap in fresh mozzarella.
| Variation | Base Sauce | Key Toppings | Cheese Type | Best For |
|---|---|---|---|---|
| Classic | Pizza sauce | Bell peppers, mushrooms | Mozzarella | Kids & traditionalists |
| Spicy | Spicy marinara | Jalapeños, red pepper flakes | Pepper jack | Adults |
| Mexican | Salsa | Black beans, corn, cilantro | Monterey Jack | Taco Tuesday vibes |
| Keto | Sugar-free sauce | Mushroom, spinach | Full-fat mozzarella | Low-carb dieters |
| Mediterranean | Hummus | Feta, tomatoes, olives | Mozzarella mix | Mediterranean food lovers |
| BBQ | BBQ sauce | Chicken, red onion | Cheddar-mozzarella | Comfort food fans |
Serving Suggestions for Mini Mummy Pizzas
These spooky pizzas shine brightest when paired with complementary sides and served with Halloween flair.
Perfect Pairings:
- Creepy Crudités: Serve alongside a veggie platter arranged to look like a monster or spider web. Baby carrots become witch fingers, cherry tomatoes are eyeballs, and ranch dressing becomes “ghost slime.”
- Spooky Salad: A simple mixed green salad with balsamic vinaigrette cuts through the richness of the cheese and adds freshness to your plate.
- Sweet Potato Fries: Bake sweet potato fries seasoned with paprika and serve them as “monster fingers” complete with almond “fingernails.”
- Apple Slices: For balance, offer apple slices on the side. Cut them into monster mouths by adding almond slivers as teeth healthy and festive!
Drink Pairings:
For kids, serve these with “witches’ brew” (green apple juice with a splash of lemon-lime soda) or “vampire blood” (cranberry juice). Adults might enjoy them with a crisp Italian lager, a light Pinot Grigio, or a festive pumpkin beer. The mild, cheesy flavor pairs beautifully with both light, refreshing beverages and slightly sweeter options.
Presentation Ideas:
Arrange your mummy pizzas on a large black platter dusted with “spider web” made from drizzled ranch dressing. Add plastic spiders, dry ice (keep it away from food!), or Halloween-themed napkins. For parties, label them with fun names like “Tomb-ato Mummies” or “Cheese-bound Ghouls” on small tent cards.
FAQs About Mini Mummy Pizzas
Can I use frozen pizza dough?
Absolutely! Thaw frozen pizza dough according to package directions, then roll it out and cut into 4-inch rounds using a cookie cutter or glass. Par-bake the rounds for 5 minutes at 400°F before topping to ensure they cook through completely.
Can I make these dairy-free?
Yes! Use dairy-free mozzarella alternatives available at most grocery stores. Brands like Violife, Daiya, or Miyoko’s melt reasonably well. You may need to add an extra minute or two of baking time, and the stretch won’t be quite as dramatic, but the flavor is still great.
How do I prevent the olives from sliding off?
Press the olive slices firmly into the cheese before baking, making sure they nestle into the gaps between cheese strips. You can also use a tiny dab of sauce underneath each olive piece to act as “glue.” If olives keep sliding, try cutting small slits in the base and tucking the olives partially into those indents.
Can I prep these ahead for a party?
Definitely! Assemble the pizzas completely up to 24 hours in advance, cover with plastic wrap, and refrigerate. Bake them just before guests arrive so they’re warm and the cheese is at peak meltiness. You can also bake them ahead and reheat, though fresh-from-the-oven is always best.
What if my kids won’t eat vegetables?
Try finely mincing vegetables and mixing them into the pizza sauce so they’re “hidden.” Bell peppers, mushrooms, and spinach blend seamlessly when diced small enough. The melted cheese also helps camouflage veggies kids might normally reject.
Are Mini Mummy Pizzas safe for toddlers?
Yes, but with a few modifications. Use less cheese to reduce choking risk, cut the pizzas into smaller pieces, and ensure everything is cooled to lukewarm before serving. Skip the whole olives and use finely chopped ones mixed into the sauce instead.
How do I fix burnt edges?
If your pizzas are browning too quickly, tent them loosely with aluminum foil for the last few minutes of baking. This allows the cheese to continue melting while protecting the edges from over-browning.
Can I make giant mummy pizzas instead of minis?
Absolutely! Use a full-sized pizza crust or flatbread and follow the same technique with longer cheese strips. Increase baking time to 15-18 minutes, and use more olives to create multiple sets of mummy eyes for a dramatic effect.
Conclusion
There you have it everything you need to create show-stopping Mini Mummy Pizzas that’ll be the talk of your Halloween celebration! These little wrapped wonders prove that spooky food doesn’t have to be complicated or time-consuming. With just a handful of ingredients and 20 minutes, you can transform simple pizza basics into festive, fun, and seriously delicious treats that kids and adults alike will devour.
The beauty of this recipe lies in its flexibility. Whether you’re cooking for picky eaters, accommodating dietary restrictions, or trying to sneak in some vegetables, these mummy pizzas adapt to your needs without losing an ounce of Halloween spirit. Plus, the assembly process is so easy that even young helpers can participate, making it a perfect family cooking activity during the spooky season.
If you enjoyed this recipe, be sure to share it with your friends or save it for later! I’d love to see your unique twist feel free to post your photos on Pinterest!
Mini Mummy Pizzas: Fun, Cheesy, and Perfect for Halloween
- Total Time: 20 mins
- Yield: 8 mini pizzas 1x
- Diet: Vegetarian
Description
These Mini Mummy Pizzas are a quick, spooky, and delicious Halloween snack made with simple ingredients and ready in under 20 minutes!
Ingredients
4 mini pizza bases or English muffins
1 cup pizza sauce
1 cup shredded mozzarella or sliced string cheese
Black olives for eyes
Optional toppings: bell peppers, mushrooms, corn
Instructions
1. Preheat oven to 375°F (190°C).
2. Spread pizza sauce over each mini base.
3. Add thin cheese strips to form mummy bandages.
4. Place olive slices as eyes.
5. Bake 10–12 minutes until golden and melty.
6. Cool slightly before serving.
Notes
For extra crispiness, toast your base before adding sauce.
Kids can help decorate their own mummies!
- Prep Time: 10 mins
- Cook Time: 10 mins
- Category: Snacks, Halloween
- Method: Baked
- Cuisine: American
Nutrition
- Serving Size: 1 pizza
- Calories: 150
- Sugar: 2g
- Sodium: 250mg
- Fat: 7g
- Saturated Fat: 3g
- Unsaturated Fat: 2g
- Trans Fat: 0g
- Carbohydrates: 15g
- Fiber: 1g
- Protein: 6g
- Cholesterol: 15mg
Keywords: Mini Mummy Pizzas, Halloween snacks, kids recipes