

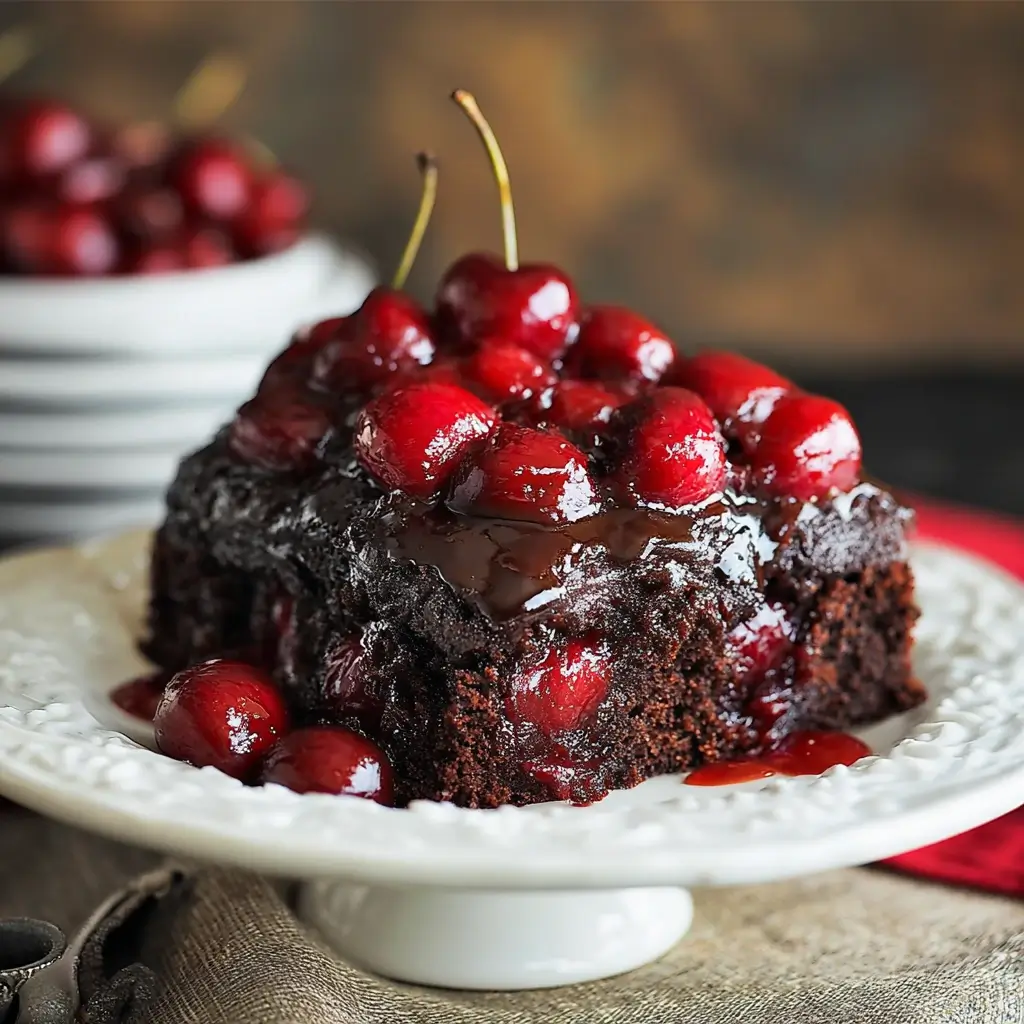
Chocolate Cherry Upside-Down Cake – just saying those words makes my heart skip a beat! Picture this: you’re hosting a dinner party, and everyone’s had their fill of the main course. Then you flip that cake pan, and suddenly there’s this collective “wow” as the gorgeous cherry-studded masterpiece reveals itself. That’s exactly what happened at my last gathering, and it’s a moment I’ll never forget.
Hey there! I’m Emeli from FoodFansy, and let me tell you – this isn’t just another dessert recipe. This is the cake that saved my reputation at my neighbor’s potluck when my original dessert fell flat (literally). In my years of exploring kitchens around the world and perfecting recipes that bring people together, I’ve learned that sometimes the most show-stopping desserts are surprisingly simple to make.
Today, I’m sharing everything you need to know about this Chocolate Cherry Upside-Down Cake – from selecting the perfect cherries to mastering that dramatic flip that’ll have your guests thinking you’re a pastry wizard. We’ll cover ingredient secrets, foolproof techniques, creative variations, and answer all those burning questions you might have.
Why This Chocolate Cherry Upside-Down Cake Recipe Works
This Chocolate Cherry Upside-Down Cake has become my go-to showstopper for three incredible reasons that make it absolutely foolproof:
• Uses pantry staples you probably already have – No exotic ingredients or specialty trips to gourmet stores required • Ready in under an hour from start to finish – Perfect for both spontaneous sweet cravings and planned celebrations
• Delivers bakery-quality results every single time – The upside-down method creates natural caramelization that’s impossible to mess up
The genius lies in the simplicity. While traditional cakes can be finicky about mixing methods and precise measurements, this beauty is incredibly forgiving. The cherry pie filling acts as both decoration and moisture insurance, while the cocoa-rich batter transforms into something that tastes like it came from a high-end patisserie.
Choosing the Right Ingredients for Your Chocolate Cherry Upside-Down Cake
The secret to an exceptional Chocolate Cherry Upside-Down Cake starts with understanding your star players. Let me share the insider knowledge I’ve gathered from countless baking experiments.
Best Cherry Options for This Recipe
Canned cherry pie filling is actually your best friend here – I know it sounds less “from scratch,” but hear me out. The consistency is perfect, the sweetness is balanced, and it won’t make your cake soggy like fresh cherries sometimes can. Look for brands with whole cherries rather than broken pieces for the most stunning presentation.
If you’re feeling adventurous, you can absolutely use fresh cherries. Just pit about 2 cups, toss with ¼ cup sugar and 1 tablespoon cornstarch, and let them sit for 10 minutes before using.
Cocoa Powder Makes the Difference
Not all cocoa powders are created equal for this Chocolate Cherry Upside-Down Cake. I prefer unsweetened Dutch-processed cocoa for its rich, deep flavor that pairs beautifully with the tart cherries. If you only have natural cocoa powder, that works too – just expect a slightly more acidic chocolate note.
Oil vs. Butter Debate
This recipe calls for vegetable oil, and there’s good science behind it. Oil creates a more tender, moist crumb that stays fresh longer than butter-based cakes. Plus, it won’t compete with the cherry flavors – it lets them shine while providing that perfect cake texture.
Ingredients & Prep for Perfect Chocolate Cherry Upside-Down Cake
Getting your Chocolate Cherry Upside-Down Cake prep right is half the battle won. Here’s how I approach each component for guaranteed success.
Essential Prep Steps
Pan preparation is crucial – and I learned this the hard way after my first upside-down cake stuck stubbornly to the pan. Grease that 9×13 inch pan generously with butter or cooking spray, paying special attention to the corners.
Room temperature matters for some ingredients, but not others. Your water can be straight from the tap, but if your oil has been stored somewhere cold, let it come to room temperature. This ensures even mixing without overworking the batter.
Mixing Method Secrets
The beauty of this Chocolate Cherry Upside-Down Cake lies in its “dump and stir” simplicity, but there’s still technique involved. Combine all your dry ingredients first – flour, sugar, cocoa, baking soda, and salt – and whisk them thoroughly. This distributes the leavening agents evenly.
For the wet ingredients, I like to whisk the water, oil, vinegar, and vanilla in a large measuring cup. That splash of vinegar might seem odd, but it reacts with the baking soda to create extra lift and tenderness.
Pantry Staples That Make Magic
White vinegar is your secret weapon – it tenderizes the cake and enhances the chocolate flavor. Baking soda provides the lift, while the combination of oil and water creates that perfect moist texture that pairs beautifully with the fruit topping.
Step-by-Step Cooking Instructions for Chocolate Cherry Upside-Down Cake
Let me walk you through the process that’s made this Chocolate Cherry Upside-Down Cake my most requested recipe. I’ve refined these steps through dozens of baking sessions.
Pre-Cooking Prep for Your Chocolate Cherry Upside-Down Cake
Start by preheating your oven to 350°F – this timing is crucial because you want your oven ready the moment your batter is mixed. Overmixing is the enemy of tender cake, so having everything ready to go prevents that temptation to keep stirring while waiting.
Spread that cherry pie filling evenly across the bottom of your greased pan. Here’s a pro tip I discovered: use a fork to gently redistribute the cherries so they’re not clumped together. You want every slice to have beautiful cherry distribution.
Mixing Method for Perfect Chocolate Cherry Upside-Down Cake
In your large bowl, whisk together flour, sugar, cocoa, baking soda, and salt until there are no streaks of cocoa. In a separate bowl or large measuring cup, combine water, oil, vinegar, and vanilla – whisk until the mixture is uniform.
Now comes the crucial moment: pour the wet ingredients into the dry ingredients all at once. Using a wooden spoon or large spatula, stir just until the mixture comes together. It should look slightly lumpy – that’s perfect! Smooth batter means overmixed batter, which equals tough cake.
Baking Technique for Chocolate Cherry Upside-Down Cake
Carefully pour the batter over the cherries, starting from one corner and working your way across. Use an offset spatula to gently spread it to the edges, being careful not to disturb the cherry layer below.
Bake for 35-40 minutes – start checking at 35 minutes with a wooden pick inserted into the center. It should come out clean with no wet batter clinging to it. A few moist crumbs are fine, but any wet batter means it needs more time.
The Grand Flip for Your Chocolate Cherry Upside-Down Cake
Here’s where the magic happens! Let the cake cool for exactly 5 minutes – no more, no less. Too hot and it falls apart; too cool and it sticks. Run a knife around the edges, place a large serving platter over the pan, and in one confident motion, flip it over. Let it sit for 30 seconds before lifting the pan. If any cherries stick, just gently place them back where they belong.
Pro Tips for Perfect Chocolate Cherry Upside-Down Cake
After making this Chocolate Cherry Upside-Down Cake countless times, I’ve discovered some game-changing techniques that separate good cakes from absolutely spectacular ones.
Avoiding Common Pitfalls with Chocolate Cherry Upside-Down Cake
The number one mistake I see is overmixing the batter. Unlike creaming butter and sugar, this method requires a light touch. Stir just until you can’t see dry flour – lumps are your friends here.
Pan size matters more than you think. Using a different size pan will throw off cooking times and texture. Stick with the 9×13 inch for the ratios in this recipe. If you only have round pans, use two 9-inch rounds and adjust the baking time to 25-30 minutes.
Essential Tools for Chocolate Cherry Upside-Down Cake Success
A large, flat serving platter is non-negotiable for the flip. I learned this when I tried using a too-small plate and ended up with cake on my counter! Choose something at least 2 inches larger than your pan on all sides.
An offset spatula makes spreading the batter so much easier without disturbing the cherry layer. If you don’t have one, the back of a large spoon works in a pinch.
Storage & Serving Your Chocolate Cherry Upside-Down Cake
This cake actually improves overnight! The flavors meld beautifully, and the texture becomes even more tender. Store covered at room temperature for up to 3 days, or refrigerate for up to a week.
For longer storage, wrap cooled cake tightly and freeze for up to 3 months. Thaw overnight in the refrigerator before serving.
Flavor Variations for Your Chocolate Cherry Upside-Down Cake
One of the things I love most about this Chocolate Cherry Upside-Down Cake is how adaptable it is to different tastes and dietary needs. Let me share some variations that have become favorites in my kitchen.
Spicy Twist on Chocolate Cherry Upside-Down Cake
Add ½ teaspoon of cinnamon and a pinch of cayenne pepper to the dry ingredients for a Mexican chocolate vibe. The heat plays beautifully with the sweet cherries and rich chocolate. I’ve also tried adding ¼ teaspoon of chipotle powder for a smoky heat that’s absolutely divine.
Healthier Options for Chocolate Cherry Upside-Down Cake
For a reduced sugar version, use sugar-free cherry pie filling and reduce the granulated sugar to 1 cup. The cake will be slightly less sweet but still delicious. You can also substitute half the all-purpose flour with whole wheat pastry flour for added fiber without compromising texture.
Global Flavors Meet Chocolate Cherry Upside-Down Cake
European flair: Add 1 teaspoon of almond extract along with the vanilla, and sprinkle sliced almonds over the cherries before adding the batter. This creates a Black Forest cake vibe that’s absolutely stunning.
Asian inspiration: Replace the vanilla with ½ teaspoon of five-spice powder for an intriguing flavor profile that pairs surprisingly well with chocolate and cherries.
| Variation | Modification | Flavor Profile | Best For |
|---|---|---|---|
| Mexican Chocolate | Add cinnamon + cayenne | Warm, spicy, complex | Adventurous palates |
| Black Forest Style | Almond extract + sliced almonds | Classic, elegant, nutty | Special occasions |
| Reduced Sugar | Sugar-free cherries + less sugar | Lighter, fruit-forward | Health-conscious guests |
| Five-Spice | Replace vanilla with five-spice | Exotic, warming, unique | Dinner parties |
Serving Suggestions for Your Chocolate Cherry Upside-Down Cake
This Chocolate Cherry Upside-Down Cake is stunning on its own, but the right accompaniments can elevate it from delicious to absolutely memorable.
Perfect Pairings
Vanilla ice cream is classic for a reason – the cold, creamy vanilla provides the perfect temperature and flavor contrast to the warm, rich cake. But don’t stop there! Try it with cherry vanilla ice cream for a flavor echo that’s pure genius.
Fresh whipped cream with a touch of almond extract complements the fruit beautifully. I like to add just ¼ teaspoon of almond extract to 1 cup of heavy cream while whipping.
Beverage Pairings for Chocolate Cherry Upside-Down Cake
Coffee is obviously wonderful, but try it with cold brew for an interesting temperature contrast. The smooth, less acidic profile of cold brew won’t compete with the cake’s complex flavors.
For wine lovers, a Port or late-harvest Riesling creates an elegant dessert course. The sweetness level matches beautifully without being overwhelming.
FAQs About Chocolate Cherry Upside-Down Cake
After sharing this recipe with thousands of home bakers, I’ve heard every question imaginable about this Chocolate Cherry Upside-Down Cake. Here are the most common concerns and my tried-and-true solutions.
Can I make this Chocolate Cherry Upside-Down Cake ahead of time?
Absolutely! This cake actually tastes better the next day. The flavors have time to meld, and the texture becomes even more tender. You can bake it up to 2 days ahead and store covered at room temperature.
What if my Chocolate Cherry Upside-Down Cake sticks to the pan?
Don’t panic! This has happened to the best of us. Let the cake cool completely, then place the pan over low heat for 30 seconds to warm the bottom slightly. The stuck portions should release. If you still have stubborn spots, carefully remove them with a spatula and arrange them back on the cake – no one will ever know!
Can I use different fruits in this recipe?
Definitely! Pineapple rings create a classic upside-down cake, while sliced pears or apples work beautifully in fall. Just make sure any substitute fruit has similar moisture content to cherry pie filling. Fresh fruits may need to be pre-cooked with a little sugar and cornstarch.
Is this Chocolate Cherry Upside-Down Cake safe during pregnancy?
Yes! All ingredients are pregnancy-safe. The small amount of vinegar cooks out completely, and there are no raw eggs or alcohol in this recipe.
Conclusion
There you have it – everything you need to create a Chocolate Cherry Upside-Down Cake that’ll have people asking for the recipe! This isn’t just a dessert; it’s a conversation starter, a memory maker, and proof that some of the most spectacular results come from the simplest techniques.
I love hearing from fellow home cooks who’ve tried this recipe, so don’t forget to share your results! Tag me @foodfansy on social media – I feature reader creations regularly, and your beautiful cake might be next.
Ready to create some kitchen magic? Fire up that oven and let’s make something unforgettable together! And if you love show-stopping desserts like this, be sure to check out my [Classic Pineapple Upside-Down Cake] and [Triple Chocolate Brownies] – they’re perfect companions to this cherry masterpiece.
Happy baking! – Emeli
If you enjoyed this recipe, be sure to share it with your friends or save it for later!
I’d love to see your unique twist—feel free to post your photos on Pinterest!