
Back-to-School Homemade Twinkies hold a special place in my heart. I’ll never forget the first time I attempted to recreate these golden, cream-filled cakes in my kitchen. It was during my early days as a culinary student, when I was determined to prove that childhood favorites could be made from scratch with real ingredients. The smell of vanilla-scented sponge cake filling my apartment instantly transported me back to elementary school lunchboxes and playground trades. That’s when I realized: some foods are more than just recipes they’re time machines wrapped in nostalgia.
I’m Emeli, the creator of FoodFansy, where I celebrate the recipes that bring us together and remind us why we fell in love with cooking in the first place. These homemade Twinkies deliver on their promise: light, fluffy cakes with a cloud-like vanilla cream filling that puts store-bought versions to shame. Whether you’re packing lunchboxes for the kids or reliving your own childhood memories, this recipe transforms simple pantry ingredients into pure joy.
As someone who’s trained in professional kitchens and explored desserts across continents, I can tell you that mastering the art of a perfect sponge cake and smooth cream filling is easier than you think. In this guide, I’ll walk you through selecting the right ingredients, achieving that signature golden texture, and filling your cakes like a pro. Plus, I’ll share storage tips, flavor variations, and answers to your most common questions.
Why This Back-to-School Homemade Twinkies Recipe Works
These Back-to-School Homemade Twinkies aren’t just a nostalgic treat they’re a practical solution for busy families and dessert lovers alike. Here’s why this recipe stands out:
- Uses simple, pantry-friendly ingredients: No specialty items required just cake flour, eggs, butter, and vanilla you likely already have.
- Ready in under 30 minutes: From mixing to baking, these come together quickly, making them perfect for weekend baking sessions or spontaneous treats.
- Customizable and fun: Switch up the filling flavors or add food coloring for themed parties and school events.
- Healthier than store-bought: You control the ingredients, meaning no mysterious preservatives or artificial flavors.
- Perfect for lunchboxes and parties: These individual cakes are portion-controlled, portable, and always a crowd-pleaser.
Choosing the Right Ingredients for Homemade Twinkies
The magic of Homemade Twinkies lies in using quality ingredients that create that signature light, airy texture.
Best Ingredients for This Recipe
Cake flour is non-negotiable here. Its lower protein content creates the delicate, tender crumb that makes Twinkies so distinctive. All-purpose flour will make your cakes denser and less authentic. Room-temperature eggs are crucial they incorporate more air when separated, giving you that fluffy, springy texture. The unsalted butter in both the cake and filling ensures you control the sweetness and salt levels perfectly.
Buying Tips
Look for fresh eggs with bright, firm yolks they’ll whip up to better volume. When selecting cake flour, brands like Swans Down or Softasilk are widely available and reliable. For the powdered sugar in your filling, sift it before mixing to avoid lumps that can clog your piping bag. If you’re using a vanilla extract, spring for pure vanilla rather than imitation the flavor difference is noticeable in such a simple recipe.
Substitutions
If you can’t find cake flour, make your own by replacing 2 tablespoons of all-purpose flour per cup with cornstarch. For a dairy-free version, swap the butter with vegan butter sticks (not margarine, which has too much water). You can also use plant-based milk in the filling. The egg whites are essential for structure, so there’s no easy egg substitute here but aquafaba (chickpea liquid) can work if you’re experienced with vegan baking.
Ingredients & Prep for Back-to-School Homemade Twinkies
Cake Prep Essentials
Start by separating your eggs carefully even a drop of yolk in your whites will prevent them from whipping properly. Bring eggs to room temperature by placing them in warm water for 5 minutes. Sifting the cake flour and baking powder together ensures even distribution and removes any lumps. The key to tender Twinkies is a gentle hand: when folding ingredients, use a spatula and make sweeping motions from the bottom of the bowl up and over, rotating the bowl as you go. Overmixing deflates those precious air bubbles you’ve worked to create.
Filling Ingredients
The cream filling is where you can get creative, but the classic version is beautifully simple. Make sure your butter is truly softened not melted, not cold so it creams smoothly with the powdered sugar. The vanilla extract should be pure for the best flavor. That tablespoon of milk adjusts the consistency; add it slowly because you want a filling thick enough to hold its shape but smooth enough to pipe easily.
Pantry Staples
Beyond the recipe ingredients, you’ll need a Twinkie pan or small oval molds (silicone works great), a piping bag with a small round tip, and parchment paper for lining your baking sheet. A stand mixer or hand mixer is essential for whipping egg whites to stiff peaks doing it by hand would take forever and likely not achieve the right texture.

Step-by-Step Cooking Instructions for Homemade Twinkies
Pre-Cooking Prep for Homemade Twinkies
Before you mix anything, preheat your oven to 350°F (175°C) an accurate temperature is crucial for even baking. Generously grease your Twinkie pan or oval molds with butter, then dust with flour, tapping out the excess. This double-layer of fat and flour creates a non-stick barrier that helps your cakes release cleanly. Line a baking sheet underneath your molds to catch any drips and make cleanup easier. Have all your ingredients measured and at room temperature before you begin this French technique called “mise en place” makes the actual mixing smooth and stress-free.
Cooking Method for Back-to-School Twinkies
Begin by whipping your egg whites with a hand mixer or stand mixer on medium-high speed until stiff peaks form when you lift the beater, the peaks should stand straight up without folding over. Set aside. In a separate bowl, beat the egg yolks, sugar, and vanilla together for 3-4 minutes until the mixture is pale yellow and fluffy. This aeration is what gives Twinkies their light texture.
Gently fold in the sifted flour and baking powder using a rubber spatula stop as soon as the flour disappears. Drizzle in the melted butter around the edges of the bowl and fold it in with minimal strokes. Finally, add one-third of the whipped egg whites and fold them in to lighten the batter, then gently fold in the remaining whites. The batter should look fluffy and cloud-like.
Fill each mold about two-thirds full they’ll rise as they bake. Smooth the tops with a wet finger if needed. Bake for 12-15 minutes, rotating the pan halfway through for even browning. Avoid opening the oven door during the first 10 minutes, as temperature drops can cause the cakes to deflate.
Doneness Check for Homemade Twinkies
Your Twinkies are done when they’re golden brown on top and spring back when lightly pressed. Insert a toothpick into the center it should come out completely clean with no wet batter clinging to it. The edges should be lightly browned but still soft, not crispy. If they’re browning too quickly but still wet inside, reduce your oven temperature by 25°F and bake for an additional 2-3 minutes.
Resting Your Homemade Twinkies
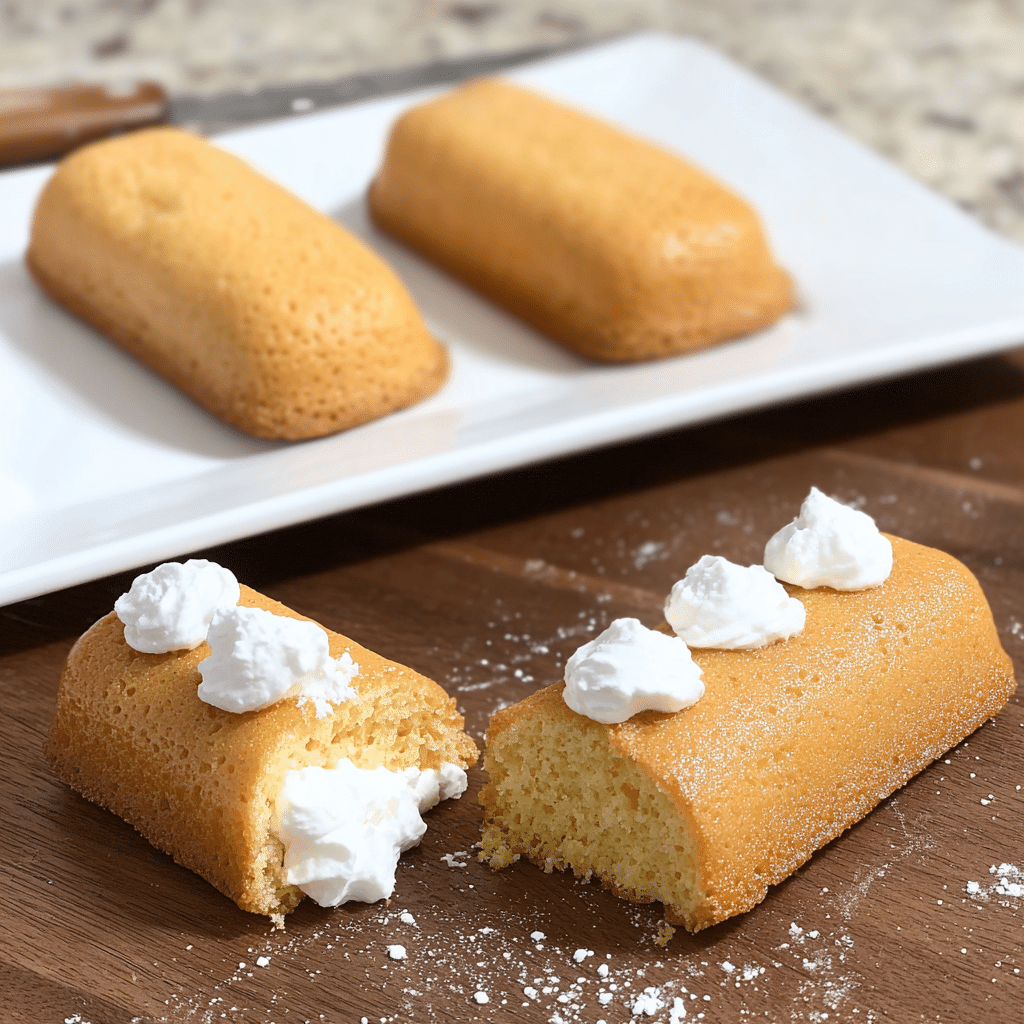
Let the cakes cool in the pan for 5 minutes, then carefully turn them out onto a wire rack to cool completely this takes about 30 minutes. Cooling is essential because if you fill them while warm, the cream will melt and leak out. Once cooled, use a toothpick or skewer to poke three small holes in the bottom of each cake spacing them evenly along the length. Fill a piping bag fitted with a small round tip with your cream filling, insert it into each hole, and gently squeeze until you feel slight resistance (the cake will feel heavier and the filling may start to peek out).
Pro Tips for Perfect Homemade Twinkies
Avoiding Dense or Dry Twinkies
The biggest mistake is overmixing the batter after adding the flour this develops gluten and creates a tough, dense cake. Fold just until the ingredients are combined. Don’t skip the egg white whipping step those stiff peaks are what make Twinkies light and airy. If your cakes turn out dry, you may have overbaked them; reduce the time by 1-2 minutes next time. Also, make sure your oven temperature is accurate by using an oven thermometer.
Tool Recommendations for Back-to-School Twinkies
A Twinkie pan is the authentic way to make these, giving you that iconic oblong shape. However, silicone mini oval molds or even a madeleine pan work well as substitutes. A stand mixer makes whipping egg whites effortless, though a good hand mixer will do the job. For filling, use a piping bag with a small round tip (Wilton #12 or similar) you can also use a squeeze bottle with a narrow nozzle in a pinch. A wire cooling rack ensures air circulates around the cakes, preventing soggy bottoms.
Storage & Reheating Homemade Twinkies
Store your filled Twinkies in an airtight container at room temperature for up to 2 days, or refrigerate for up to 5 days. The cream filling is stable because of the butter base. For longer storage, freeze unfilled cakes wrapped individually in plastic wrap for up to 2 months thaw at room temperature and fill fresh. Don’t microwave these; they’re best enjoyed at room temperature or slightly chilled. If the cream filling becomes too firm from refrigeration, let them sit at room temperature for 15 minutes before serving.
Flavor Variations for Homemade Twinkies
Chocolate Twist
Add 3 tablespoons of cocoa powder to your cake batter (reduce flour by 3 tablespoons) for chocolate Twinkies. Or try a chocolate cream filling by mixing 2 tablespoons of melted chocolate into your vanilla cream base.
Strawberry Dream
Mix 2 tablespoons of strawberry jam into your cream filling for a fruity variation. You can also add a few drops of pink food coloring to make them festive for Valentine’s Day or birthday parties.
Coffee-Flavored Twinkies
Dissolve 1 teaspoon of instant espresso powder in the melted butter before adding it to the batter, and add another half teaspoon to the cream filling. This creates a sophisticated mocha flavor that adults will love.
Global Flavors
Try a matcha version by adding 1 tablespoon of matcha powder to the flour mixture for a Japanese-inspired green tea flavor. For dulce de leche Twinkies, fill them with store-bought or homemade dulce de leche instead of vanilla cream. An Italian twist could include lemon zest in the batter and mascarpone whipped with powdered sugar for the filling.
Flavor Variation Comparison Table
| Variation | Cake Modification | Filling Modification | Best For |
|---|---|---|---|
| Classic Vanilla | None | Original vanilla cream | Traditional taste, all ages |
| Chocolate | Add 3 tbsp cocoa powder | Optional: add melted chocolate | Chocolate lovers, parties |
| Strawberry | None | Add 2 tbsp strawberry jam | Spring events, pink-themed parties |
| Coffee Mocha | Add 1 tsp espresso powder | Add ½ tsp espresso powder | Adult gatherings, morning treats |
| Matcha Green Tea | Add 1 tbsp matcha powder | None or add condensed milk | Adventurous eaters, afternoon tea |
| Dulce de Leche | None | Replace with dulce de leche | Latin-inspired menus, caramel fans |
| Lemon Mascarpone | Add lemon zest | Use mascarpone instead of butter | Summer picnics, elegant desserts |
Serving Suggestions for Back-to-School Twinkies
These Homemade Twinkies shine as a standalone treat, but they’re versatile enough to dress up or down. Pack them in lunchboxes with fresh fruit and cheese cubes for a balanced snack. For birthday parties, arrange them on a tiered cake stand with colorful sprinkles dusted on top. They’re also perfect for bake sales wrap them individually in cellophane tied with ribbon for an adorable presentation.
Pair these nostalgic cakes with a glass of cold milk for the classic experience, or serve alongside fresh berries and whipped cream for a more elegant dessert plate. For adult gatherings, offer them with coffee or cappuccino the subtle sweetness complements espresso beautifully. You can even create a Twinkie trifle by cubing them and layering with pudding, whipped cream, and fresh fruit in a glass bowl.
For beverages, try c prosecco for celebrations, as the bubbles cut through the richness of the cream filling. A vanilla latte or chai tea also makes a wonderful pairing for afternoon snacks.
FAQs About Homemade Twinkies
Can I use frozen eggs? It’s best to use fresh eggs for this recipe. Frozen eggs don’t whip up to the same volume when separated, which affects the cake’s texture. If you must use frozen, thaw them completely in the refrigerator overnight and bring to room temperature before using.
How do I fix overcooked Twinkies? If your cakes came out dry, you can brush them lightly with simple syrup (equal parts sugar and water, heated until dissolved) before filling. This adds moisture back into the cake. Alternatively, serve them with ice cream or a fruit compote to mask the dryness.
Is this recipe safe for pregnant women? Yes, this recipe is safe during pregnancy as all ingredients are fully cooked. The eggs are baked to a safe internal temperature, eliminating any risk of salmonella. Just ensure your eggs are fresh and properly stored.
Can I make these ahead of time? Absolutely! Bake the cakes up to 2 days ahead and store them unfilled in an airtight container. Fill them the day you plan to serve for the freshest taste. The filling can also be made a day ahead and refrigerated just let it come to room temperature and re-whip slightly before piping.
What if I don’t have a Twinkie pan? Use mini loaf pans, madeleine pans, or even a muffin tin just adjust baking time down to 8-10 minutes for smaller molds. The shape won’t be authentic, but the flavor will be just as delicious.
Why did my egg whites deflate? This usually happens if there was any grease, yolk, or water in the bowl. Make sure your bowl and beaters are completely clean and dry. Also, don’t overbeat the whites once they form stiff peaks, stop immediately.
Can I double this recipe? Yes, this recipe doubles easily. Just mix in batches rather than trying to double everything in one bowl it’s easier to fold ingredients properly in smaller quantities.
Conclusion
Now it’s your turn to bring the magic of Back-to-School Homemade Twinkies into your kitchen! Fire up that oven, whip those egg whites, and get ready to taste a childhood memory reimagined with real, wholesome ingredients. These golden, cream-filled cakes prove that the best treats are the ones made with your own hands and shared with the people you love.
Join the thousands of home cooks in the FoodFansy community who’ve already discovered that nostalgia tastes even better when it’s homemade. Snap a photo of your Twinkies and share your creation with us I’d love to see your unique twists and flavor experiments!
If you enjoyed this recipe, be sure to share it with your friends or save it for later! I’d love to see your unique twist feel free to post your photos on Pinterest!
Back-to-School Homemade Twinkies Fun & Nostalgic Treats
- Total Time: 30 minutes
- Yield: 12 Twinkies 1x
- Diet: Vegetarian
Description
Soft, golden sponge cakes filled with creamy vanilla filling the perfect back-to-school nostalgic treat!
Ingredients
1 cup cake flour
1 tsp baking powder
4 large eggs (separated)
3/4 cup sugar
1/4 cup unsalted butter (melted)
1 tsp vanilla extract
1/2 cup butter (softened)
1 cup powdered sugar
1 tsp vanilla extract
1 tbsp milk
Instructions
1. Preheat oven to 350°F (175°C).
2. Grease and flour Twinkie molds.
3. Separate eggs and whip whites until stiff.
4. Beat yolks, sugar, and vanilla until fluffy.
5. Fold dry ingredients into the wet mixture.
6. Add melted butter and gently fold in egg whites.
7. Fill molds two-thirds full and bake 12–15 minutes.
8. Cool completely before filling.
9. Prepare cream by mixing butter, sugar, and vanilla.
10. Pipe cream into cooled cakes and serve.
Notes
Store in an airtight container for 4 days.
Freeze for up to 2 months.
Try flavor variations like chocolate or lemon.
- Prep Time: 15 minutes
- Cook Time: 15 minutes
- Category: Dessert
- Method: Baking
- Cuisine: American
Nutrition
- Serving Size: 1 Twinkie
- Calories: 190
- Sugar: 14g
- Sodium: 85mg
- Fat: 8g
- Saturated Fat: 5g
- Unsaturated Fat: 3g
- Trans Fat: 0g
- Carbohydrates: 24g
- Fiber: 0g
- Protein: 3g
- Cholesterol: 65mg
Keywords: Back-to-School Homemade Twinkies Fun & Nostalgic Treats, homemade dessert, lunchbox snacks