
Hey there! I’m Emeli, and I’ll never forget the Christmas Eve my grandmother surprised us with her famous red velvet cake. The way that deep crimson slice looked against the white tablecloth, the collective “oohs” around the table it was pure magic. Years later, as a chef and storyteller at FoodFansy, I’ve taken that cherished memory and transformed it into something even more spectacular: a Christmas Red Velvet Cheesecake that combines the nostalgic appeal of red velvet with the luxurious creaminess of cheesecake.
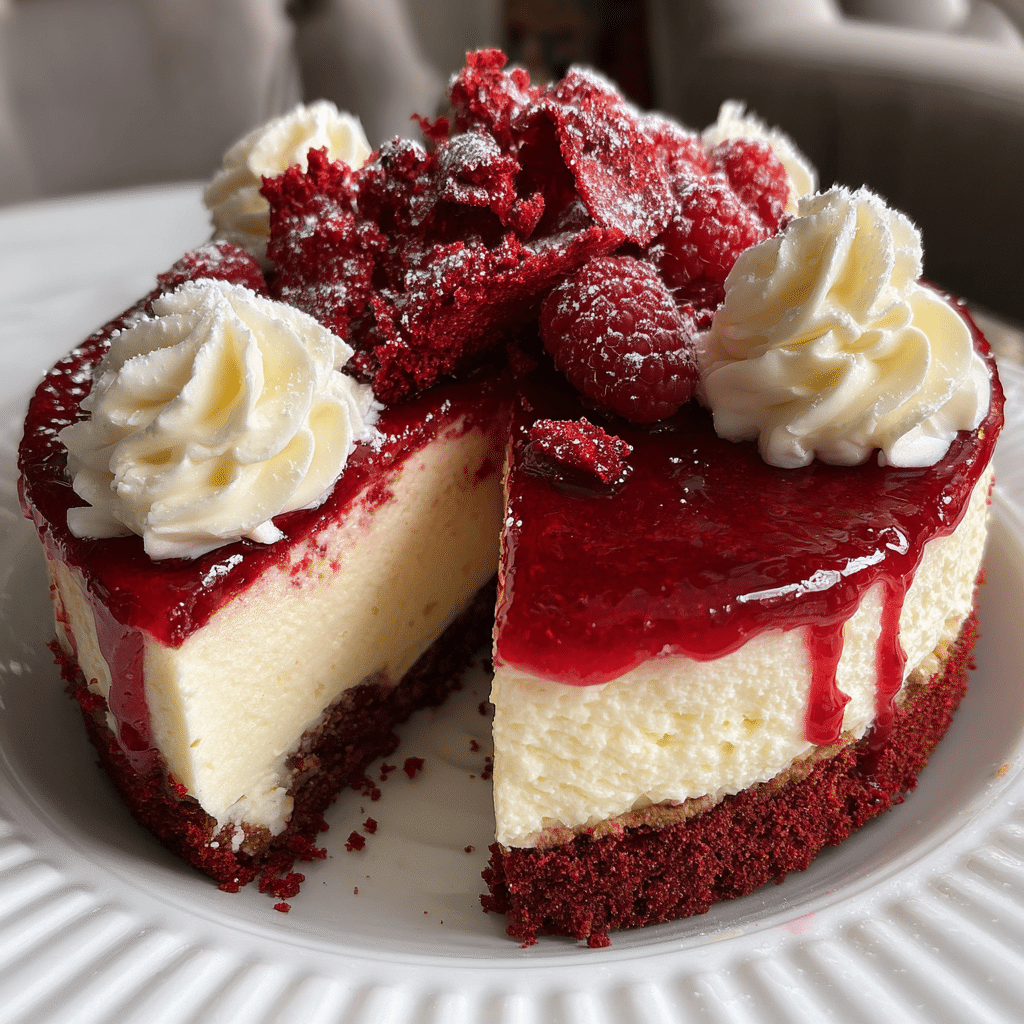
If you’ve ever struggled with cheesecakes that crack, or red velvet cakes that turn out dry and dense, this recipe is your holiday miracle. This stunning two-layer masterpiece features a tender red velvet base topped with silky cheesecake, creating a dessert that’s not only breathtaking but also surprisingly forgiving for home bakers.
Having trained in professional kitchens and spent years perfecting holiday desserts, I’ve cracked the code on keeping cheesecakes smooth and red velvet moist. In this guide, you’ll discover foolproof techniques for layering, baking temperatures that prevent cracks, and the secret resting time that makes all the difference. Plus, I’ll share tips on ingredient prep, doneness checks, and gorgeous serving ideas that’ll make your Christmas table unforgettable.
Why This Christmas Red Velvet Cheesecake Works
This isn’t just another holiday dessert it’s the showstopper your celebration deserves. Here’s what makes this Christmas Red Velvet Cheesecake so special:
- Two iconic desserts in one: Red velvet’s subtle cocoa flavor perfectly complements rich, tangy cheesecake
- Stunning visual impact: That gorgeous red-and-white contrast screams Christmas elegance
- Make-ahead friendly: Requires 6+ hours of chilling, so you can prep the day before and stress less on Christmas
- Easier than it looks: The layered baking method is surprisingly straightforward, even for nervous bakers
- Crowd-pleaser guaranteed: Appeals to both cheesecake lovers and red velvet fans—no dessert rivalry at your table
Choosing the Right Ingredients for Christmas Red Velvet Cheesecake
The quality of your ingredients directly impacts the final result. Let me walk you through what matters most.
Best Dairy for This Christmas Red Velvet Cheesecake
Cream cheese: Use full-fat, brick-style cream cheese (not spreadable). Philadelphia is the gold standard—it creates that smooth, dense texture we’re after. Bring it to room temperature for at least 2 hours; cold cream cheese creates lumps no amount of mixing can fix.
Butter: European-style butter with higher fat content (like Kerrygold) gives the red velvet layer richer flavor, but regular unsalted butter works beautifully too. Room temperature is crucial—it should dent easily when pressed.
Red Food Coloring Selection
For that stunning Christmas red, I recommend gel or paste food coloring over liquid. Liquid dilutes your batter and creates a pinkish hue instead of that gorgeous, deep red. Wilton or Americolor gel colorings deliver vibrant results with just 1-2 tablespoons.
Flour and Cocoa Quality Matters
All-purpose flour works perfectly here—no need for cake flour. For cocoa powder, use natural (not Dutch-processed) unsweetened cocoa. Natural cocoa’s acidity reacts with baking powder to create red velvet’s signature tender crumb.
Ingredients & Prep for Christmas Red Velvet Cheesecake
Proper preparation is half the battle won. Here’s how to set yourself up for success.
Baking Prep Essentials for Christmas Red Velvet Cheesecake
Before you start mixing, take these critical steps:
- Line the springform pan with parchment: Cut a circle for the bottom and wrap the outside with aluminum foil (this prevents leaks if you use a water bath)
- Bring all dairy ingredients to room temperature: This takes 2-3 hours. Cold ingredients don’t incorporate smoothly and create a dense, heavy texture
- Preheat oven for even baking: Give your oven a full 15-20 minutes to reach temperature. Uneven heating causes cracks and uneven baking
Red Velvet Base Ingredients
For the bottom red velvet layer, you’ll need:
- Flour: 1½ cups all-purpose, spooned and leveled (don’t pack it)
- Cocoa powder: 2 tablespoons natural unsweetened cocoa
- Sugar: ¾ cup granulated sugar
- Eggs: 2 large eggs, room temperature
- Butter: ½ cup (1 stick) unsalted butter, softened
- Red food coloring: 1-2 tablespoons gel or paste coloring
Pro tip: Let the red velvet batter rest for 10 minutes before baking. This allows the flour to fully hydrate, resulting in a more tender, moist texture.
Pantry Staples for Christmas Red Velvet Cheesecake
Don’t overlook these supporting players:
- Vanilla extract: 2 teaspoons pure vanilla (not imitation you’ll taste the difference)
- Salt: ½ teaspoon to balance sweetness and enhance chocolate notes
- Baking powder: 1 teaspoon for lift and structure
Step-by-Step Cooking Instructions for Christmas Red Velvet Cheesecake
Let’s build this beauty layer by layer. Take your time rushing is the enemy of great cheesecake.
Pre-Cooking Prep for Christmas Red Velvet Cheesecake
- Grease and line your pan: Spray a 9-inch springform pan with baking spray, then line the bottom with parchment. This double insurance prevents sticking.
- Mix dry ingredients separately: In a medium bowl, whisk together flour, cocoa powder, baking powder, and salt. This ensures even distribution so you don’t get pockets of baking powder.
- Beat cream cheese until smooth: Using a stand mixer or hand mixer, beat room-temperature cream cheese on medium speed for 2-3 minutes until completely smooth and fluffy with no lumps. Scrape down the bowl frequently.
Baking Method for Christmas Red Velvet Cheesecake
This two-stage baking process is the secret to success:
Stage 1 – Red Velvet Layer:
- Pour the red velvet batter into your prepared pan and spread evenly
- Bake at 350°F (175°C) for exactly 15 minutes
- The layer will look slightly underdone that’s perfect. It continues cooking with the cheesecake layer on top
Stage 2 – Cheesecake Layer:
- Remove pan from oven and reduce temperature to 325°F (160°C)
- Gently pour the cheesecake batter over the red velvet layer, spreading to the edges
- Bake at 325°F (160°C) for 45-50 minutes
- The lower temperature prevents cracking and ensures creamy texture
Doneness Check for Christmas Red Velvet Cheesecake
Don’t rely on a toothpick test for cheesecake here’s what to look for:
- Center should jiggle slightly: When you gently shake the pan, the center 2-3 inches should wobble like Jell-O. It firms up during cooling
- Edges should be set: The outer ring should look matte and slightly puffed, not glossy or wet
If you insert a thermometer, you’re looking for 150°F in the center. But honestly, the jiggle test is more reliable.
Resting Time for Christmas Red Velvet Cheesecake
This is where patience pays off:
- Cool in oven with door cracked for 1 hour: Turn off the oven, crack the door open about 4 inches, and let the cheesecake gradually cool. This prevents the dreaded crack from sudden temperature change.
- Refrigerate at least 6 hours before slicing: Overnight is even better. Cold cheesecake slices cleanly and the flavors meld beautifully. Cover loosely with plastic wrap once cooled to room temperature.
Pro Tips for Perfect Christmas Red Velvet Cheesecake
Want bakery-quality results? These insider techniques make all the difference.
Avoiding Cracks in Your Christmas Red Velvet Cheesecake
Cracks happen when cheesecake bakes too fast or cools too quickly. Here’s your prevention plan:
- Don’t overcrowd the oven: Bake the cheesecake alone no other pans competing for heat
- Use a water bath (optional but recommended): Wrap your foil-covered springform pan and place it in a larger roasting pan. Add hot water halfway up the sides. The steam keeps the top moist
- Avoid overmixing: Once you add eggs to the cheesecake batter, mix on low speed just until combined. Overmixing incorporates air bubbles that expand and cause cracks
Tool Recommendations for Christmas Red Velvet Cheesecake
Invest in these for consistent success:
- 9-inch springform pan: The removable sides make unmolding stress-free. Avoid cheap pans that leak
- Stand mixer or hand mixer: A wooden spoon won’t get cream cheese smooth enough
- Offset spatula: Perfect for spreading batters evenly
- Kitchen scale: For precise measurements (especially important for flour)
Storage & Reheating for Christmas Red Velvet Cheesecake
- Refrigeration: Cover and store for up to 5 days. The cheesecake actually tastes better on days 2-3 as flavors develop
- Freezing: Wrap individual slices in plastic wrap, then foil. Freeze for up to 3 months. Thaw overnight in the refrigerator
- Serving: Always serve cold. This isn’t a dessert that needs warming the contrast of cool, creamy cheesecake is part of its appeal
Flavor Variations for Christmas Red Velvet Cheesecake
Make this recipe your own with these creative twists.
White Chocolate Twist
Melt 4 ounces of white chocolate and swirl it into the cheesecake batter before pouring over the red velvet layer. The sweetness complements the tang beautifully.
Peppermint Christmas Red Velvet Cheesecake
Add ½ teaspoon peppermint extract to the cheesecake layer and top with crushed candy canes before serving. It’s festive and refreshing.
Cream Cheese Frosting Topping
For ultimate decadence, spread a thin layer of cream cheese frosting on top once chilled. Pipe rosettes around the edge and place fresh cranberries in the center.
Comparison of Popular Christmas Red Velvet Cheesecake Variations
| Variation | Flavor Profile | Best For | Prep Difficulty |
|---|---|---|---|
| Classic | Sweet, tangy, subtle cocoa | Traditional celebrations | Easy |
| White Chocolate Swirl | Rich, extra sweet | Chocolate lovers | Medium |
| Peppermint | Fresh, minty, festive | Modern holiday tables | Easy |
| Cream Cheese Frosted | Ultra-rich, decadent | Special occasions only | Medium |
| Oreo Crust | Cookies & cream vibe | Kids and casual parties | Easy |
Serving Suggestions for Christmas Red Velvet Cheesecake
Presentation is everything with this showstopper dessert.
Plating ideas:
- Dust with powdered sugar for a snowy effect
- Drizzle with white chocolate ganache in a zigzag pattern
- Garnish each slice with fresh raspberries and mint leaves
- Serve on white plates to make that red pop
Beverage pairings:
- Coffee: A dark roast balances the sweetness perfectly
- Dessert wine: Late harvest Riesling or Moscato d’Asti complement the cream cheese
- Hot chocolate: For an extra-festive, ultra-indulgent Christmas moment
- Champagne: Brut or extra dry cuts through the richness
Occasion styling: This Christmas Red Velvet Cheesecake is perfect for Christmas dinner dessert, holiday potlucks, New Year’s Eve parties, or as a stunning gift for neighbors and friends. Transport it in the springform pan (leave the sides on) for safe travel.
FAQs About Christmas Red Velvet Cheesecake
Can I use a regular cake pan instead of a springform pan?
You can, but I don’t recommend it. Removing cheesecake from a regular pan almost always damages the sides. If you must, line the entire pan with parchment with overhang to lift it out.
How do I fix a cracked Christmas Red Velvet Cheesecake?
Don’t panic cover it! A layer of whipped cream, cream cheese frosting, or fresh berries completely hides cracks. No one will know, and it’ll still taste incredible.
Can I make this Christmas Red Velvet Cheesecake ahead?
Absolutely—in fact, I insist! Make it 1-2 days before your event. The flavors improve and you’ll have one less thing to stress about on the day of.
Is this recipe safe during pregnancy?
Yes, as long as you use pasteurized eggs and dairy (which is standard in the US). The cheesecake is fully baked, so there are no food safety concerns.
Why is my red velvet layer too dense?
This usually happens when butter or cream cheese is too cold, or when you overmix. Make sure all ingredients are truly at room temperature and mix just until combined.
Can I halve this recipe?
Yes, use a 6-inch springform pan and reduce baking times by about 25%. Check for doneness using the jiggle test.
Conclusion
There you have it your complete guide to creating a Christmas Red Velvet Cheesecake that’ll have everyone at your holiday table asking for seconds (and the recipe!). From the velvety red base to the creamy cheesecake crown, every layer is designed to impress while remaining approachable for home bakers.
Fire up your oven and make this tonight! Whether it’s your first time attempting cheesecake or you’re a seasoned baker looking for a new holiday tradition, this recipe delivers both wow-factor and flavor in equal measure.
Join thousands of home cooks at FoodFansy who’ve discovered that extraordinary desserts don’t require a pastry degree just good ingredients, careful technique, and a little patience. Share your Christmas Red Velvet Cheesecake creations with me on social media using #FoodFansyBakes I can’t wait to see your beautiful results!
If you enjoyed this recipe, be sure to share it with your friends or save it for later! I’d love to see your unique twist feel free to post your photos on Pinterest!
Print
Christmas Red Velvet Cheesecake – Creamy & Festive Holiday Dessert
- Total Time: 480
- Yield: 12 1x
- Diet: Vegetarian
Description
A stunning two-layer Christmas dessert featuring a tender red velvet cake base topped with silky smooth cheesecake. This show-stopping holiday treat combines the nostalgic appeal of red velvet with luxurious cream cheese filling, creating a festive masterpiece that’s surprisingly easy to make. Perfect for Christmas dinner or holiday gatherings!
Ingredients
1½ cups all-purpose flour
2 tablespoons natural unsweetened cocoa powder
¾ cup granulated sugar
2 large eggs, room temperature
½ cup (1 stick) unsalted butter, softened
1–2 tablespoons red gel food coloring
2 teaspoons pure vanilla extract
½ teaspoon salt
1 teaspoon baking powder
24 oz (3 packages) full-fat cream cheese, room temperature
1 cup granulated sugar (for cheesecake layer)
3 large eggs, room temperature (for cheesecake layer)
1 teaspoon vanilla extract (for cheesecake layer)
⅓ cup sour cream, room temperature
Instructions
1. Preheat oven to 350°F (175°C). Grease a 9-inch springform pan with baking spray and line the bottom with parchment paper. Wrap the outside of the pan with aluminum foil.
2. In a medium bowl, whisk together flour, cocoa powder, baking powder, and salt. Set aside.
3. In a large mixing bowl, beat softened butter and ¾ cup sugar with an electric mixer on medium speed until light and fluffy, about 3 minutes.
4. Add 2 eggs one at a time to the butter mixture, beating well after each addition. Mix in 1 teaspoon vanilla extract and red food coloring until fully combined.
5. Gradually fold the dry ingredients into the wet ingredients until just combined. Do not overmix. Let batter rest for 10 minutes.
6. Pour red velvet batter into prepared springform pan and spread evenly. Bake at 350°F for 15 minutes. Remove from oven and reduce temperature to 325°F (160°C).
7. While red velvet layer bakes, prepare cheesecake filling. Beat cream cheese in a large bowl on medium speed for 2-3 minutes until completely smooth and no lumps remain.
8. Add 1 cup sugar to cream cheese and beat until well combined. Add sour cream and 1 teaspoon vanilla, mixing until smooth.
9. Add 3 eggs to cheesecake mixture one at a time, mixing on low speed just until incorporated after each addition. Do not overmix to avoid air bubbles.
10. Gently pour cheesecake batter over the baked red velvet layer, spreading to the edges with an offset spatula.
11. Bake at 325°F (160°C) for 45-50 minutes. The center should jiggle slightly when gently shaken, and edges should be set and slightly puffed.
12. Turn off oven and crack the door open about 4 inches. Let cheesecake cool in the oven for 1 hour to prevent cracking.
13. Remove from oven and let cool to room temperature, about 1 hour. Cover loosely with plastic wrap.
14. Refrigerate for at least 6 hours or overnight before removing springform pan sides and slicing.
15. For clean slices, wipe knife with a warm, damp cloth between each cut. Garnish with powdered sugar, whipped cream, or fresh berries before serving.
Notes
Room temperature ingredients are crucial for smooth, lump-free cheesecake. Set cream cheese, butter, eggs, and sour cream out 2-3 hours before baking.
Use gel or paste food coloring instead of liquid for vibrant red color without thinning the batter.
The red velvet layer will look slightly underdone after 15 minutes—this is correct. It continues cooking when the cheesecake layer is added.
Optional water bath: Place foil-wrapped springform pan in a larger roasting pan and add hot water halfway up the sides for extra insurance against cracking.
Store covered in refrigerator for up to 5 days. The cheesecake tastes even better on day 2-3 as flavors develop.
To freeze: Wrap individual slices tightly in plastic wrap, then foil. Freeze for up to 3 months. Thaw overnight in refrigerator.
Troubleshooting cracks: Cover with whipped cream, cream cheese frosting, or fresh berries—no one will know!
For peppermint variation: Add ½ teaspoon peppermint extract to cheesecake layer and top with crushed candy canes.
- Prep Time: 30
- Cook Time: 65
- Category: Dessert
- Method: Baking
- Cuisine: American
Nutrition
- Serving Size: 1 slice
- Calories: 420
- Sugar: 32g
- Sodium: 280mg
- Fat: 28g
- Saturated Fat: 17g
- Unsaturated Fat: 9g
- Trans Fat: 0g
- Carbohydrates: 38g
- Fiber: 1g
- Protein: 7g
- Cholesterol: 145mg
Keywords: Christmas Red Velvet Cheesecake, red velvet cheesecake, holiday dessert, Christmas dessert, layered cheesecake, festive dessert, red velvet cake