
Chocolate Chip Salted Caramel Tart – just saying those words makes my mouth water! Are you tired of desserts that promise the world but deliver disappointment? Those dry, crumbly tarts that fall apart before they reach your mouth, or caramel that’s either too sweet or not rich enough? I’ve been there, and I know the frustration.
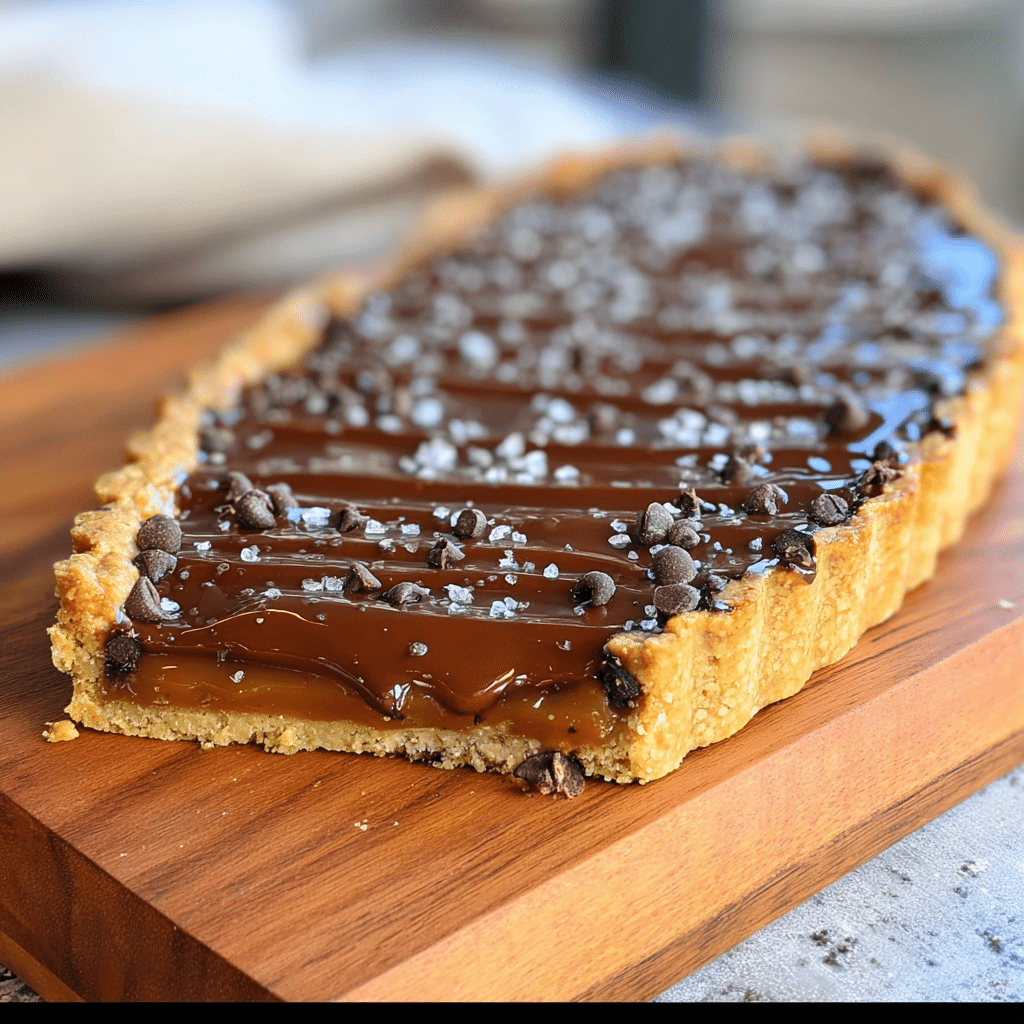
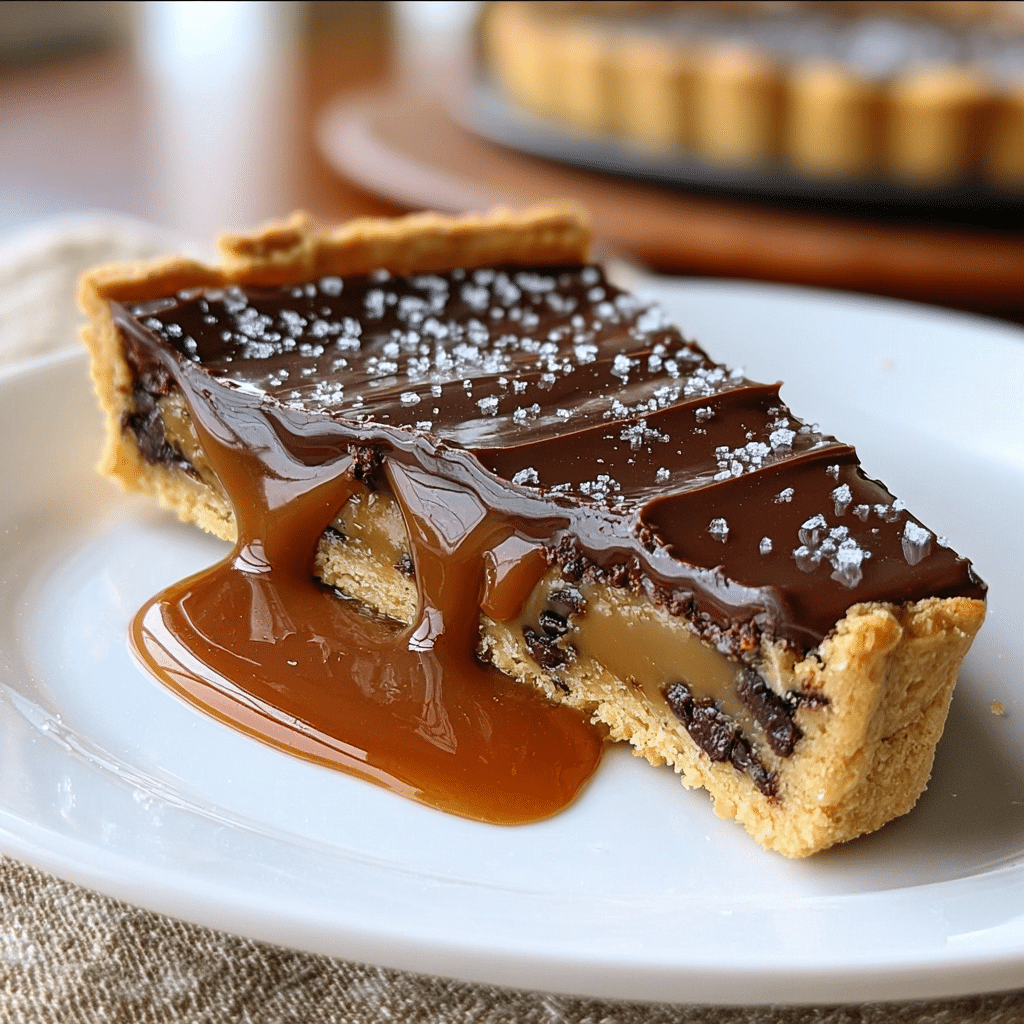
This chocolate chip salted caramel tart will change everything you thought you knew about indulgent desserts. Picture this: a buttery, chewy chocolate chip cookie base that holds its shape perfectly, topped with silky homemade salted caramel that strikes the perfect balance between sweet and salty, all crowned with a glossy chocolate fudge glaze and a sprinkle of fleur de sel. It’s the kind of dessert that makes people stop mid-conversation and ask, “Where did you get this recipe?”
As someone who’s spent years perfecting desserts in professional kitchens and countless home experiments, I can tell you that this tart represents everything I love about baking – it’s approachable yet impressive, combines familiar flavors in an unexpected way, and never fails to create those special kitchen moments that bring people together.
In this guide, I’ll walk you through choosing the right ingredients for maximum impact, share my foolproof techniques for perfect caramel every time, give you step-by-step instructions that guarantee success, and reveal my pro tips for presentation that will make this tart the star of any table.
Why This Chocolate Chip Salted Caramel Tart Recipe Works
There’s a reason this chocolate chip salted caramel tart has become my go-to showstopper dessert, and it all comes down to smart technique and balanced flavors. Unlike traditional tart shells that can be finicky and prone to shrinking, this recipe uses a chocolate chip cookie base that’s virtually foolproof and adds incredible flavor depth.
Here’s what makes this recipe truly special:
• Uses everyday ingredients you likely have in your pantry – no specialty flours or hard-to-find items required • Three distinct textures in perfect harmony – chewy cookie base, smooth caramel, and rich chocolate glaze • Make-ahead friendly for stress-free entertaining – components can be prepared separately and assembled when ready • Scales beautifully for any occasion – perfect for intimate dinners or large gatherings • The sweet-salty balance that keeps people coming back – each bite delivers complexity without overwhelming any single flavor
Choosing the Right Ingredients for Your Chocolate Chip Salted Caramel Tart
The magic of this chocolate chip salted caramel tart lies in using quality ingredients that each play a specific role in the final result. Let me guide you through the essentials that will make or break your tart.
Best Ingredients for This Recipe
For the Cookie Base: The foundation of our tart needs to be sturdy yet tender. I use a combination of brown and white sugars – the brown sugar adds moisture and that subtle molasses flavor that pairs beautifully with caramel, while white sugar provides structure. Mini chocolate chips are crucial here; they distribute more evenly than regular chips and won’t sink to the bottom during baking.
For the Caramel: This is where quality really matters. Heavy cream with at least 35% fat content gives you that luxurious texture, while good sea salt (not table salt) provides clean, mineral notes that enhance rather than overpower the caramel’s sweetness.
For the Chocolate Glaze: Semi-sweet chocolate chips work perfectly here – they have enough cocoa content for rich flavor but enough sugar to create a smooth, glossy finish.
Shopping Tips for Success
When selecting ingredients, look for unsalted Challenge butter (or any high-quality European-style butter) that’s pale yellow and has a sweet, clean aroma. For chocolate chips, choose ones that feel firm and have a slight shine – avoid any that look dull or have white bloom.
The corn syrup might seem optional, but it prevents sugar crystallization in your caramel and gives the chocolate glaze that professional glossy finish. Don’t substitute honey or maple syrup here; corn syrup’s neutral flavor and unique properties are what you need.
Smart Substitutions
If you can’t find mini chocolate chips, roughly chop regular chocolate chips into smaller pieces. In a pinch, you can substitute the heavy cream in the caramel with whole milk mixed with 2 tablespoons of butter, though the texture won’t be quite as rich.
Ingredients & Prep for Your Chocolate Chip Salted Caramel Tart
Getting your chocolate chip salted caramel tart prep right is half the battle won. This recipe has three components that come together beautifully, but each needs attention to detail.
Essential Prep Steps
Cookie Base Preparation: Room temperature butter is non-negotiable – it should give slightly when pressed but not be melted or greasy. If you forgot to take it out early, cut it into small cubes and let it sit for 15 minutes, or soften it gently in the microwave using 5-second intervals.
The key to a perfect cookie base is not overmixing once you add the flour. Mix just until the flour disappears – overmixing develops gluten and creates a tough base instead of the tender, chewy texture we want.
Timing Your Components
Make-Ahead Strategy: The beauty of this tart is that each component can be made ahead. The cookie base can be baked up to 2 days in advance and stored covered at room temperature. The caramel can be made up to a week ahead and stored in the refrigerator (just warm it gently before using).
Same-Day Timeline: If making everything the day you serve, start with the cookie base (1 hour including cooling), then make the caramel while the base cools (30 minutes), and finish with the chocolate glaze (15 minutes). Allow 2-3 hours total cooling time before serving.
Pantry Essentials
Beyond the main ingredients, make sure you have parchment paper for easy removal, an offset spatula for smooth chocolate spreading, and a candy thermometer if you’re nervous about caramel color (though visual cues work perfectly fine).
Step-by-Step Cooking Instructions for Your Chocolate Chip Salted Caramel Tart
Creating the perfect chocolate chip salted caramel tart is all about timing and temperature control. I’ll walk you through each component with the precision you need for bakery-quality results.
Pre-Cooking Prep for Your Chocolate Chip Salted Caramel Tart
Before you begin, preheat your oven to 350°F and gather all ingredients at room temperature. This isn’t just convenience – room temperature ingredients blend more easily and create better texture. Have your rectangular tart pan ready (a 9×13 inch pan works if you don’t have a tart pan), and line it with parchment paper for easy removal.
Measure all your caramel ingredients and have them within arm’s reach. Caramel waits for no one, so being prepared prevents any panic moments when the sugar starts to darken.
Cooking Method for Your Chocolate Chip Salted Caramel Tart
Step 1: Create the Cookie Base Cream the butter and sugars until light and fluffy – this takes about 3 minutes with an electric mixer. The mixture should look almost white and feel noticeably lighter. Add vanilla and egg, mixing until just combined, then gently fold in the flour mixture and chocolate chips.
Press the dough into your tart pan, creating higher edges and a lower center – this creates the perfect well for your fillings. The 5-minute chill before baking is crucial; it prevents the edges from slumping during baking.
Step 2: Perfect the Caramel This is where patience pays off. Cook your sugar mixture without stirring once it starts bubbling. The color change from clear to honey happens quickly – usually around 8-10 minutes depending on your heat level. Pull it off the heat at light honey color; it will continue darkening from residual heat.
Step 3: Finish with Chocolate The chocolate glaze should be smooth and glossy. If it seems too thick, add a teaspoon of warm cream. If too thin, let it cool for a few minutes to thicken slightly.
Doneness Check for Your Chocolate Chip Salted Caramel Tart
Your cookie base is done when the edges are golden brown and the center springs back lightly when touched. The caramel reaches perfection at 240°F if using a thermometer, or when it’s the color of honey. The chocolate glaze is ready when it coats the back of a spoon and holds its shape when drizzled.
Resting Your Chocolate Chip Salted Caramel Tart
Patience is your friend here. Let the cookie base cool completely before adding caramel – about 20 minutes. Allow the caramel layer to set for at least 10 minutes before adding chocolate. The final tart needs 2-3 hours in the refrigerator to set properly for clean slicing.
Pro Tips for Perfect Chocolate Chip Salted Caramel Tart
After making countless versions of this chocolate chip salted caramel tart, I’ve learned the subtle techniques that separate good from extraordinary. These insider tips will help you achieve professional results every time.
Avoiding Common Pitfalls with Your Chocolate Chip Salted Caramel Tart
Preventing Soggy Cookie Base: The biggest mistake I see is not creating proper drainage in the cookie base. When you press down the center after initial baking, you’re not just making room for fillings – you’re creating slight ridges that prevent the caramel from seeping into the cookie and making it soggy.
Caramel Temperature Control: Never rush the caramel. Medium heat is your friend, even if it takes longer. High heat creates hot spots that burn before the rest caramelizes properly. If your caramel seizes (becomes grainy), you can often save it by adding a tablespoon of warm cream and whisking vigorously off the heat.
Chocolate Glaze Perfection: For a mirror-smooth chocolate layer, let the chocolate mixture cool for exactly 3-4 minutes before pouring. Too hot and it will be too thin; too cool and you’ll get visible brush marks or an uneven surface.
Essential Tool Recommendations
A candy thermometer takes the guesswork out of caramel, but if you don’t have one, drop a small amount of caramel into cold water – it should form a soft ball at the perfect stage. An offset spatula is invaluable for spreading the chocolate glaze evenly without disturbing the caramel underneath.
Storage & Make-Ahead Magic
This chocolate chip salted caramel tart actually improves with time. Store covered in the refrigerator for up to 5 days – the flavors meld beautifully. For longer storage, wrap individual slices in plastic wrap and freeze for up to 3 months. Thaw in the refrigerator overnight before serving.
Flavor Variations for Your Chocolate Chip Salted Caramel Tart
One of the beautiful things about this chocolate chip salted caramel tart is how easily it adapts to different flavor profiles while maintaining its stunning presentation and perfect texture balance.
Spicy Twist
Transform your tart with a pinch of cayenne pepper added to the caramel – just 1/8 teaspoon creates a subtle heat that plays beautifully with the sweetness. For chocolate lovers, add a teaspoon of espresso powder to the chocolate glaze for depth that enhances rather than competes with the caramel.
Keto and Paleo Adaptations
For keto-friendly versions, substitute the sugars in the cookie base with powdered erythritol (use 3/4 the amount). The caramel becomes trickier – try using sugar-free brown butter instead of traditional caramel, cooking butter until golden and nutty, then adding heavy cream and a touch of vanilla.
Global Flavor Inspirations
French-Inspired: Add a tablespoon of Grand Marnier to the caramel for an elegant orange note, or incorporate lavender into the chocolate glaze for a Provence-inspired finish.
Mexican Influence: Incorporate a pinch of cinnamon and vanilla into the cookie base, and finish with a sprinkle of smoked sea salt mixed with cocoa powder.
Asian Fusion: Replace half the vanilla in the caramel with sesame oil for an unexpected nutty depth, or add matcha powder to the chocolate glaze for a beautiful green color and earthy flavor.
| Variation | Cookie Base Modification | Caramel Addition | Chocolate Glaze Twist | Finishing Touch |
|---|---|---|---|---|
| Classic Decadent | Standard recipe | Extra 1/4 tsp vanilla | Standard | Fleur de sel |
| Spicy Mexican | +1/2 tsp cinnamon | +1/8 tsp cayenne | +1/2 tsp chili powder | Smoked salt + cocoa |
| French Elegance | +1 tbsp almond flour | +1 tbsp Grand Marnier | Standard | Edible gold flakes |
| Coffee Lovers | +1 tbsp espresso powder | +1 tsp coffee extract | +1 tsp espresso powder | Chocolate-covered espresso beans |
| Tropical Twist | +1/4 cup toasted coconut | +1/4 tsp coconut extract | +2 tbsp coconut oil | Toasted coconut flakes |
Serving Suggestions for Your Chocolate Chip Salted Caramel Tart
This chocolate chip salted caramel tart is rich enough to stand alone, but the right accompaniments can elevate it from impressive to unforgettable. The key is balancing the tart’s sweetness and richness with complementary flavors and textures.
Perfect Pairings: A dollop of lightly sweetened whipped cream helps cut through the richness while adding a cloud-like texture contrast. Fresh berries – especially raspberries or strawberries – provide bright acidity that highlights the caramel’s complexity. For special occasions, a small scoop of vanilla bean ice cream creates a temperature contrast that makes each bite more interesting.
Beverage Companions: Coffee is the obvious choice, but consider the intensity – a light roast might get overwhelmed, while a dark roast with chocolate notes creates beautiful harmony. For wine lovers, a glass of tawny port or a late-harvest Riesling provides sweetness levels that complement rather than compete. Even better, try it with a bourbon barrel-aged stout – the vanilla and caramel notes in the beer echo the tart’s flavors perfectly.
Presentation Ideas: Slice with a sharp knife warmed under hot water and wiped clean between cuts for professional-looking portions. Dust the plate lightly with cocoa powder, add a small garnish of fresh mint, and drizzle any remaining caramel around the plate for restaurant-style presentation.
FAQs About Chocolate Chip Salted Caramel Tart
Can I make this tart ahead of time? Absolutely! This chocolate chip salted caramel tart actually benefits from overnight chilling. The flavors develop and meld beautifully, and the texture becomes perfectly set for clean slicing. Make it up to 3 days ahead and store covered in the refrigerator.
What if my caramel turns grainy? Don’t panic – this is usually caused by sugar crystallization. Remove from heat immediately and whisk in 1-2 tablespoons of warm heavy cream. If it’s still grainy, strain the mixture through a fine-mesh sieve to remove any crystals.
Can I use a different pan size? Yes, but adjust accordingly. A 9-inch round tart pan works perfectly with the same recipe. For a 9×13 inch rectangular pan, you might have slightly thinner layers, but the taste will be identical.
How do I know when the caramel is the right color? Look for a light to medium amber color – think honey or maple syrup. It should smell nutty and sweet, not burnt. Remember, it continues to darken slightly even after removing from heat.
Is this recipe safe for pregnant women? Yes, all ingredients are pregnancy-safe when using pasteurized eggs and dairy products, which are standard in most grocery stores.
Can I freeze individual slices? Absolutely! Wrap each slice tightly in plastic wrap, then place in a freezer bag. They’ll keep for up to 3 months. Thaw overnight in the refrigerator before serving.
Conclusion
There’s something magical that happens when you create a chocolate chip salted caramel tart from scratch – the way your kitchen fills with the aroma of browning butter and caramelizing sugar, the satisfaction of watching each layer come together perfectly, and most importantly, the joy on people’s faces when they take that first bite.
This recipe represents everything I love about baking: it’s approachable enough for home cooks but impressive enough for special occasions. It combines familiar flavors in an unexpected way and creates those kitchen moments that become lasting memories.
Ready to create your own masterpiece? Gather your ingredients tonight and treat yourself and your loved ones to this incredible dessert. Don’t forget to take a photo of your beautiful creation – I’d love to see your results!
Join the FoodFansy community of passionate home cooks who’ve discovered that the best meals come from the heart, not complicated techniques. Share your baking adventures with us and discover more recipes that bring people together around the table.
What’s next on your baking journey? Try our [Classic French Macarons Guide] for another show-stopping dessert, or explore our [Homemade Ice Cream Collection] for the perfect accompaniment to this rich tart!
If you enjoyed this recipe, be sure to share it with your friends or save it for later!
I’d love to see your unique twist—feel free to post your photos on Pinterest!
Print
Ultimate Chocolate Chip Salted Caramel Tart Recipe: 3 Layers of Heaven
- Total Time: 1 hr 30 mins
Description
Ingredients
Chocolate Chip Cookie Base
1 cup flour
2 tablespoons flour additional
1/4 teaspoon salt
1/4 teaspoon baking soda
6 tablespoons unsalted Challenge butter room temperature
1/2 cup brown sugar
1/4 cup sugar
1 teaspoon vanilla extract
1 egg
1 cup semisweet mini chocolate chips
Salted Caramel Filling
1/2 cup heavy cream
1 cup sugar
1 tablespoon corn syrup
1/4 cup water
3 tablespoons unsalted Challenge butter
3/4 teaspoon sea salt good quality
1 teaspoon vanilla extract
Chocolate Fudge Glaze
4 tablespoons unsalted Challenge butter
1 cup semi sweet chocolate chips
1 tablespoon corn syrup
Fleur de sel sea salt
Instructions
Make the cookie base
Preheat oven to 350°F.
In a small bowl, add the flour, baking soda and salt. Whisk, then set aside.
In the bowl of an electric mixer, cream together the butter and both sugars. Mix until fully incorporated.
While slowly mixing, add the vanilla, then egg and blend well.
While slowly mixing, pour in the flour mixture and blend just until fully combined. Add mini chocolate chips.
Scoop, then press the batter into a rectangular tart pan. Press up the sides, so the center is lower than the sides. Move batter filled pan to the fridge for 5 minutes so it’s nice and firm and cool before baking.
Bake in preheated oven for 22-25 minutes. If the edges are getting too brown before the bottom is cooked, remove pan from oven and gently cover the edges with strips of foil to prevent further browning, then return to oven for a few minutes. The cookie is done when golden brown and puffed up.
Allow cookie to cool 3-5 minutes, then use a metal measuring cup or large metal spoon to press down the center of the cookie, creating a nice sized space for the caramel and chocolate filling to be added. Cool at least 20 minutes before adding caramel sauce.
Make the caramel sauce
Warm the heavy cream in a bowl in the microwave and then set aside.
In a large saucepan, add the sugar, corn syrup, and water. Stir gently to incorporate the ingredients.
Cook over medium to medium-high heat, stirring gently, until the sugar dissolves and the mixture is bubbling.
Stop stirring and allow the mixture to boil undisturbed until it begins to darken in color. You want the mixture to reach a honey color, but no darker. The syrup will change from light in color to dark very quickly, so it’s important to watch closely and remove the pan from the heat as soon as it’s light-medium honey color.
Once removed from heat, carefully and slowly pour in the warm heavy cream (the mixture will hiss and bubble). Stir to full incorporate the cream.
Add butter and salt and stir to combine. Add vanilla.
Allow sauce to cool a bit, then pour into a jar.
Pour cooled (but still warm enough to be pour-able) caramel sauce into the cooled cookie base, leaving room for the chocolate layer as well. You will likely want to use just a bit more than half of the caramel sauce. Move dessert to the fridge to chill a bit while you prepare the chocolate layer. Store remaining caramel sauce in the fridge to enjoy at another time.
Make the Chocolate Layer
In a medium sized bowl, melt butter and chocolate in the microwave in short intervals (be careful not to overheat). Remove and stir to complete the melting.
Add corn syrup and stir to combine. Allow mixture to cool a few minutes to thicken, then pour chocolate over the cooled caramel layer. Spread with an offset spatula, as needed. Cool 5 minutes, then top with good quality sea salt, such as fleur de sel.
Cool fully (in the fridge) before slicing. Slice in thin slices, this is very rich! Enjoy!
Notes
The caramel filling can be made a day or two in advance (store in an airtight jar in the fridge).
The caramel filling recipe will make more caramel than you need. Store the remainder in a jar in the fridge and use for topping any number of desserts.
- Prep Time: 30 minutes
- Cook Time: 1 hour
- Category: Desssert
- Cuisine: American
Nutrition
- Serving Size: 12
- Calories: 519kcal
- Sugar: 45g
- Sodium: 236mg
- Fat: 30g
- Saturated Fat: 18g
- Carbohydrates: 60g
- Fiber: 3g
- Protein: 4g
- Cholesterol: 62mg
Keywords: Chocolate Chip Salted Caramel Tart