

Caramel apples are the ultimate fall indulgence, but let’s be honest have you ever bitten into one only to find a thick, rock-hard caramel shell that refuses to budge, or worse, slides right off the apple in one disappointing clump? I’ve been there, and it’s heartbreaking when a seasonal treat doesn’t live up to the hype.
This caramel apples recipe promises something better: a glossy, perfectly chewy caramel coating that clings to every crisp bite of apple, with a flavor so buttery and rich it’ll make you wonder why you ever settled for store-bought. As someone who’s spent years perfecting crowd-pleasing desserts in both professional kitchens and at home, I’ve learned that the secret to flawless caramel apples isn’t complicated it’s all about temperature control and proper apple prep.
I’m Emeli, and at FoodFansy, I believe the best recipes are the ones that bring people together without the stress. This caramel apple recipe has become my go-to for fall gatherings, Halloween parties, and cozy family nights. In this guide, I’ll walk you through choosing the right apples, achieving that perfect caramel consistency, foolproof dipping techniques, and creative topping ideas that’ll make your caramel apples the star of any autumn celebration.
Why This Caramel Apples Recipe Works
This isn’t just another caramel apples recipe it’s the one that actually delivers on the promise of fall magic. Here’s why it works every single time:
- Uses simple, pantry-friendly ingredients – No fancy equipment or hard-to-find supplies. Just butter, brown sugar, corn syrup, condensed milk, and vanilla create a caramel that’s infinitely better than anything premade.
- Reaches the perfect firm-ball stage – By cooking to exactly 245°F, you get caramel that sets beautifully without becoming tooth-breakingly hard or disappointingly drippy.
- Works with any apple variety – Whether you prefer tart Granny Smiths or sweet Honeycrisps, this recipe adapts to your taste while maintaining that signature crunch-to-chew ratio.
- Ready in under 45 minutes – From start to finish, including cooling time, you can have a batch of gorgeous caramel apples ready for eager hands (and mouths).
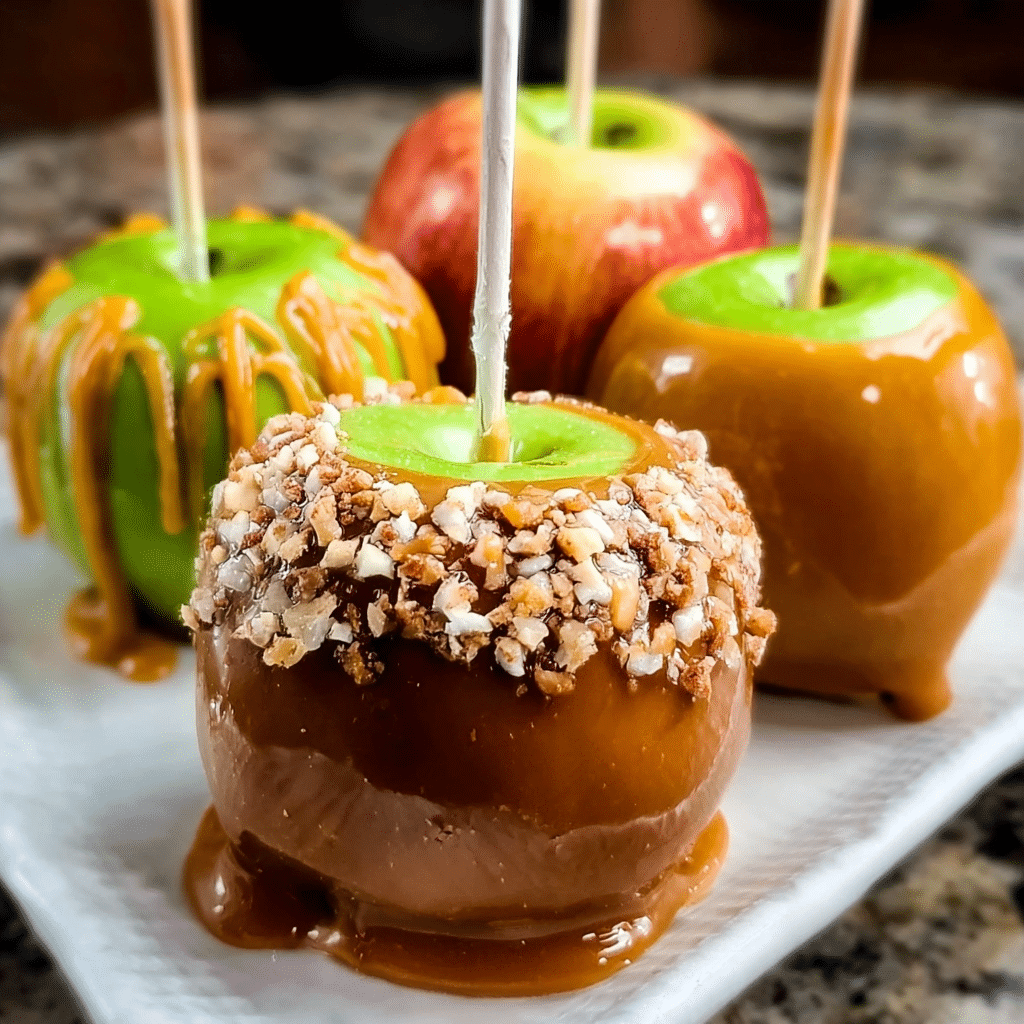
- Infinitely customizable – The base recipe is just the beginning. Roll them in crushed pretzels, drizzle with chocolate, or dust with sea salt this recipe is your creative playground.
Choosing the Right Apples for Caramel Apples
The apple you choose can make or break your caramel apple experience. Here’s everything you need to know to select winners every time.
Best Apple Varieties for Caramel Apples
Not all apples are created equal when it comes to caramel coating. Granny Smith apples are the classic choice their tart flavor cuts through the sweetness of caramel beautifully, and their firm texture holds up perfectly. Honeycrisp apples offer a sweeter option with an incredibly crisp bite that many people prefer. Fuji apples provide a nice middle ground with balanced sweetness and excellent crunch. Avoid softer varieties like Red Delicious or McIntosh, which can become mushy and don’t provide enough structural contrast to the caramel.
Buying and Prep Tips for Caramel Apples
When shopping, look for medium-sized apples that are firm to the touch with unblemished skin. Smaller apples are easier for kids to handle, while larger ones make impressive statement desserts. Here’s the most crucial step many people skip: removing the wax coating. Most store-bought apples have a food-safe wax that prevents caramel from sticking. Wash apples in very hot water with a drop of dish soap, then scrub gently with a clean towel. Rinse thoroughly and dry completely any moisture will cause caramel to slide right off.
Apple Substitutions for Caramel Apples
While traditional apples reign supreme, you can experiment with firm pears for a sophisticated twist, though they’re more delicate to handle. Some adventurous cooks have even successfully made caramel-dipped apple slices on sticks for easier eating just be sure to brush them with lemon juice to prevent browning.
Ingredients & Prep for Caramel Apples
Getting your ingredients measured and your workspace organized before you start cooking will make this process smooth and stress-free.
Apple Prep Essentials for Caramel Apples
Start by washing and drying your 6–8 medium apples thoroughly to remove any wax coating, as mentioned above. This step is non-negotiable. Next, insert sturdy wooden sticks or skewers into the top center of each apple, pushing down firmly but carefully you want them secure enough to hold the weight of the caramel. I like to twist slightly as I push to create a tight fit. Have your prepared apples standing ready on a parchment-lined baking sheet before you begin making the caramel.
Caramel Ingredients for Caramel Apples
The magic happens with just five simple ingredients that create a caramel with incredible depth and the perfect consistency:
- 1 cup unsalted butter – Provides richness and helps achieve a smooth texture
- 2 cups brown sugar – Creates complex molasses notes that elevate the flavor beyond basic caramel
- 1 cup light corn syrup – Prevents crystallization and ensures a glossy finish
- 1 can (14 oz) sweetened condensed milk – The secret ingredient for ultra-creamy, never-grainy caramel
- 1 tsp vanilla extract – Adds warmth and rounds out the sweetness
Marinating time: Not applicable here, but timing is everything. Once your apples are prepped, they should be completely dry before dipping even a drop of water will cause the caramel to slip off.
Pantry Staples and Topping Ideas for Caramel Apples
Beyond the base ingredients, keep these pantry staples on hand: quality butter makes a noticeable difference in flavor, and pure vanilla extract (not imitation) provides authentic depth. For toppings, the world is your oyster chopped pecans or peanuts add crunch, shredded coconut brings tropical flair, crushed Oreos create cookies-and-cream magic, mini chocolate chips amp up indulgence, and a sprinkle of flaky sea salt provides sophisticated contrast. Prepare your toppings in shallow bowls before you start dipping so you can work quickly while the caramel is still warm.
Step-by-Step Cooking Instructions for Caramel Apples
Follow these instructions carefully, and you’ll achieve caramel apple perfection every single time.
Pre-Cooking Prep for Caramel Apples
Before you turn on the stove, preparation is key. Line a large baking sheet with parchment paper don’t skip this or you’ll be chiseling caramel off your pan later. Arrange your washed, dried apples with sticks inserted nearby. Have your candy thermometer ready and clipped to the side of your heavy-bottomed saucepan. Measure out all your caramel ingredients and have them within arm’s reach. If you’re using toppings, pour them into shallow dishes now. Once the caramel is ready, you’ll need to work quickly.
Cooking Method for Caramel Apples
In a heavy saucepan (this is important thin pans create hot spots that burn caramel), melt the 1 cup of butter over medium heat. Once melted, stir in the brown sugar, corn syrup, and sweetened condensed milk. Bring the mixture to a gentle boil, stirring constantly with a wooden spoon or heat-resistant spatula. This is where your arm gets a workout, but constant stirring prevents burning and ensures even cooking.
Keep stirring and watch your candy thermometer closely. The mixture will bubble vigorously and gradually thicken. You’re aiming for exactly 245°F this is the firm-ball stage, which means if you drop a bit of caramel into cold water, it’ll form a firm but pliable ball. This typically takes 15–20 minutes. Don’t rush it by cranking up the heat, or you’ll end up with burnt-tasting caramel.
Once you hit 245°F, immediately remove the pan from heat and stir in the vanilla extract. The caramel will bubble up briefly this is normal. Let it sit for about 30 seconds to stop bubbling before you start dipping.
Dipping for Caramel Apples
This is the moment of truth. Tilt your saucepan slightly to create a deeper pool of caramel. Hold an apple by the stick and dip it into the caramel, tilting and rotating to coat the entire apple evenly. Some people like to leave a small band of apple visible at the top near the stick this is both practical (easier to hold) and pretty.
Lift the apple out and let excess caramel drip back into the pan for a few seconds. You can gently shake the apple or rotate it to encourage dripping. If you’re using toppings, immediately roll the bottom half or entire apple in your prepared toppings while the caramel is still warm and sticky. Place the finished apple on your parchment-lined baking sheet.
Work efficiently through all your apples. If the caramel starts to thicken too much, you can briefly return it to low heat for 30 seconds, stirring gently.
Resting for Caramel Apples
Patience is rewarded here. Allow your caramel apples to set for 15–20 minutes at room temperature the caramel will firm up beautifully and develop that perfect chewy texture. If you’re in a hurry or it’s a particularly warm day, you can refrigerate them for a quicker firm-up (about 10 minutes). However, room temperature setting generally produces a better texture. Once set, your caramel apples are ready to devour or wrap individually in cellophane for gifting.
Pro Tips for Perfect Caramel Apples
These insider tricks will elevate your caramel apples from good to absolutely spectacular.
Avoiding Common Caramel Apple Mistakes
The number one mistake? Not removing the wax. I can’t stress this enough commercial apples have a wax coating that repels caramel like oil repels water. Wash thoroughly in hot water with a tiny drop of dish soap. Another common pitfall is moisture. Even a few drops of water will cause caramel to slide off. Dry those apples meticulously and keep them at room temperature cold apples from the fridge will cause condensation.
Temperature matters tremendously. Undercooking (stopping below 245°F) gives you caramel that never fully sets and stays sticky forever. Overcooking (going beyond 250°F) creates caramel so hard it’s a dental hazard. Invest in a reliable candy thermometer it’s the difference between success and frustration. Finally, don’t rush the cooling process. Stacking caramel apples before they’re fully set creates a sticky mess.
Tool Recommendations for Caramel Apples
A candy thermometer is absolutely essential no guessing games. A heavy-bottomed saucepan prevents hot spots and burning. Thin pans are your enemy here. I prefer a 3-quart size that’s deep enough to prevent splattering. Sturdy wooden sticks are better than flimsy ones; look for “caramel apple sticks” or thick lollipop sticks at craft stores. A wooden spoon or silicone spatula for stirring is ideal because they won’t scratch your pan or conduct heat.
Storage & Reheating for Caramel Apples
Caramel apples are best enjoyed within 2–3 days for optimal texture and apple freshness. Store them at room temperature if you’ll eat them within a day, loosely covered to allow air circulation wrapping too tightly traps moisture. For longer storage, refrigerate them wrapped individually in cellophane or wax paper, but know that the caramel may soften slightly and the apples will become less crisp over time.
Unfortunately, caramel apples don’t freeze well the apple becomes mushy and the caramel weeps when thawed. However, you can make extra caramel and freeze it separately in an airtight container for up to 3 months. Reheat it gently with a splash of cream to restore the right consistency.
Flavor Variations for Caramel Apples
The classic caramel apple is perfection, but these creative twists let you customize for different tastes and occasions.
Chocolate-Drizzled Caramel Apples
After your caramel has set completely, melt 1 cup of chocolate chips (dark, milk, or white) with 1 tablespoon of coconut oil for a smooth consistency. Drizzle the chocolate over the caramel in zigzag patterns using a fork or a piping bag with a small tip. Let it set at room temperature for a stunning two-toned finish that tastes like a turtle candy.
Salted Caramel Apples
This sophisticated variation balances sweetness with savory depth. While the caramel is still warm on the apple, sprinkle it generously with flaky sea salt (not table salt the coarse crystals are key). Alternatively, you can add ½ teaspoon of sea salt directly to your caramel mixture during cooking for salted caramel throughout.
Nutty Caramel Apples
Immediately after dipping in caramel, roll the apple in finely chopped nuts pecans, peanuts, almonds, or cashews all work beautifully. For extra decadence, toast your nuts first for 5 minutes in a 350°F oven to intensify their flavor. You can also mix in ½ cup of chopped nuts directly into your caramel after removing it from heat.
S’mores Caramel Apples
Crush 1 cup of graham crackers and spread them on a plate. After dipping in caramel, roll the apple in graham cracker crumbs, then drizzle with melted chocolate and top with mini marshmallows. For an extra touch, lightly toast the marshmallows with a kitchen torch.
Candy Bar Caramel Apples
Chop up your favorite candy bars Snickers, Reese’s Cups, Butterfinger, or Heath bars and roll freshly caramel-dipped apples in the pieces. This creates a candy bar flavor bomb that kids and adults alike go crazy for.
| Variation | Key Ingredients | Best For | Prep Time |
|---|---|---|---|
| Chocolate-Drizzled | Melted chocolate chips, coconut oil | Elegant presentations, chocolate lovers | 5 minutes (after caramel sets) |
| Salted Caramel | Flaky sea salt | Adults, sophisticated palates | 1 minute |
| Nutty | Chopped pecans, peanuts, or almonds | Texture lovers, traditional taste | 5 minutes (includes toasting) |
| S’mores | Graham crackers, marshmallows, chocolate | Kids’ parties, campfire theme | 10 minutes |
| Candy Bar | Chopped Snickers, Reese’s, Butterfinger | Halloween, over-the-top indulgence | 5 minutes |
| Turtle | Pecans + chocolate drizzle | Gift-giving, special occasions | 10 minutes |
Serving Suggestions for Caramel Apples
Caramel apples are special enough to stand alone, but these pairings and presentations take them to the next level.
Perfect Pairings with Caramel Apples
Serve caramel apples as the centerpiece of a fall dessert spread alongside warm apple cider spiked with cinnamon sticks, hot chocolate topped with whipped cream for the kids, or spiced chai tea for cozy autumn afternoons. For adults, a glass of dessert wine like late-harvest Riesling or a bourbon cocktail complements the caramel’s buttery richness beautifully.
If you’re creating a dessert board, surround your caramel apples with pumpkin cookies, cinnamon donut holes, caramel popcorn, and bowls of extra toppings so guests can customize their bites. For a fun party activity, set up a caramel apple bar where guests can dip apple slices on sticks and choose their own toppings perfect for keeping little hands busy.
Presentation Ideas for Caramel Apples
Caramel apples are inherently photogenic, but thoughtful presentation makes them even more special. Arrange them on a rustic wooden board or cake stand for fall gatherings. Wrap individual apples in clear cellophane tied with autumn-colored ribbons for party favors or hostess gifts. For Halloween, add spooky googly eyes or candy corn for festive flair. Package them in kraft paper boxes with tissue paper for elegant gift-giving that travels well.
FAQs About Caramel Apples
Can I use frozen apples for caramel apples?
I don’t recommend using frozen apples. Freezing damages the apple’s cell structure, making it mushy when thawed not the crisp bite you want. Additionally, thawing creates moisture that prevents caramel from adhering properly. Always use fresh, firm apples for the best results.
How do I fix caramel that won’t stick to my apples?
This frustrating problem almost always comes down to wax or moisture. If your caramel is sliding off, your apples likely still have a wax coating. Wash them again in very hot water with a drop of dish soap, scrub with a clean towel, rinse, and dry completely. If you’ve already made caramel that won’t stick, you can gently warm the apples (not the caramel) with a hair dryer to remove any moisture, then try dipping again.
Can I make caramel apples ahead of time?
Yes, you can make them 1–2 days ahead. Store them at room temperature loosely covered for day-of events, or refrigerate them wrapped individually for up to 3 days. Just note that the apples will become less crisp over time, and refrigeration can soften the caramel slightly. For the absolute best texture and flavor, same-day is ideal, but advance preparation certainly works for busy schedules.
Is this caramel apples recipe safe for pregnant women?
Yes, this recipe is safe for pregnant women. All ingredients are fully cooked, and there are no raw eggs, unpasteurized dairy, or other concerning ingredients. The apples should be washed thoroughly (which you’re already doing to remove wax), and as long as they’re fresh and properly stored, there are no pregnancy-related concerns.
Why is my caramel grainy or crystallized?
Crystallization happens when sugar crystals form during cooking. This usually occurs if sugar crystals on the side of the pan fall back into the mixture, or if you stir too aggressively once it starts boiling. To prevent this, make sure all sugar is dissolved before the mixture boils, and stir gently and constantly (don’t whip or beat) during cooking. The corn syrup in this recipe actually helps prevent crystallization, so following the recipe precisely is your best defense.
Can I make caramel apples without corn syrup?
Corn syrup serves an important purpose it prevents crystallization and creates a smooth texture. However, you can substitute with honey or golden syrup (like Lyle’s Golden Syrup) in equal amounts. The flavor will be slightly different, and you’ll need to watch the temperature carefully as honey can brown faster. Some people try making caramel apples with just sugar, butter, and cream, but the texture tends to be less reliable.
What’s the best way to cut a caramel apple for eating?
Cutting caramel apples can be messy! The easiest method is to refrigerate the apple for about 30 minutes to firm up the caramel, then use a sharp knife dipped in hot water to slice it into wedges, wiping the knife clean between cuts. Alternatively, many people prefer to just bite into them napkins required! For parties, consider making caramel apple slices on sticks instead (dip individual apple wedges) for mess-free eating.
Conclusion
There’s something magical about making caramel apples from scratch the sweet aroma filling your kitchen, the glossy caramel coating catching the light, and that first satisfying crunch followed by rich, buttery sweetness. This recipe takes the guesswork out of what can seem like a tricky process, giving you consistently beautiful results that taste infinitely better than anything store-bought.
Whether you’re creating a fall tradition with your family, preparing treats for a Halloween party, or simply celebrating the season’s best fruit, these homemade caramel apples deliver joy in every bite. The beauty of this recipe is its versatility stick with the classic version or get creative with toppings and variations that reflect your personal style.
If you enjoyed this recipe, be sure to share it with your friends or save it for later! I’d love to see your unique twist feel free to post your photos on Pinterest!
Caramel Apples Recipe – Easy Homemade Fall Treat for Everyone
- Total Time: 45 minutes
- Yield: 6–8 caramel apples 1x
- Diet: Vegetarian
Description
Crisp apples dipped in buttery homemade caramel – a simple, classic fall treat everyone loves!
Ingredients
6–8 medium apples
1 cup unsalted butter
2 cups brown sugar
1 cup light corn syrup
1 can (14 oz) sweetened condensed milk
1 tsp vanilla extract
Instructions
1. Wash and dry apples completely.
2. Insert wooden sticks into each apple.
3. Melt butter, then stir in brown sugar, corn syrup, and condensed milk.
4. Boil until mixture reaches 245°F, stirring constantly.
5. Remove from heat and stir in vanilla.
6. Dip each apple in caramel and let set on parchment paper.
Notes
For best results, use firm apples like Granny Smith or Honeycrisp.
Decorate with nuts, chocolate drizzle, or sea salt if desired.
- Prep Time: 20 minutes
- Cook Time: 25 minutes
- Category: Dessert
- Method: Stovetop
- Cuisine: American
Nutrition
- Serving Size: 1 apple
- Calories: 320
- Sugar: 45g
- Sodium: 95mg
- Fat: 12g
- Saturated Fat: 7g
- Unsaturated Fat: 4g
- Trans Fat: 0g
- Carbohydrates: 58g
- Fiber: 3g
- Protein: 2g
- Cholesterol: 25mg
Keywords: Caramel Apples, Fall Desserts, Homemade Treats