

Cheesy Fried Grit Cakes just saying those words brings me back to my grandmother’s kitchen in Georgia, where the smell of bubbling grits and melting cheese filled the air every Sunday morning. But here’s the thing: too many people think grits are just a boring side dish, destined to be bland and forgettable.
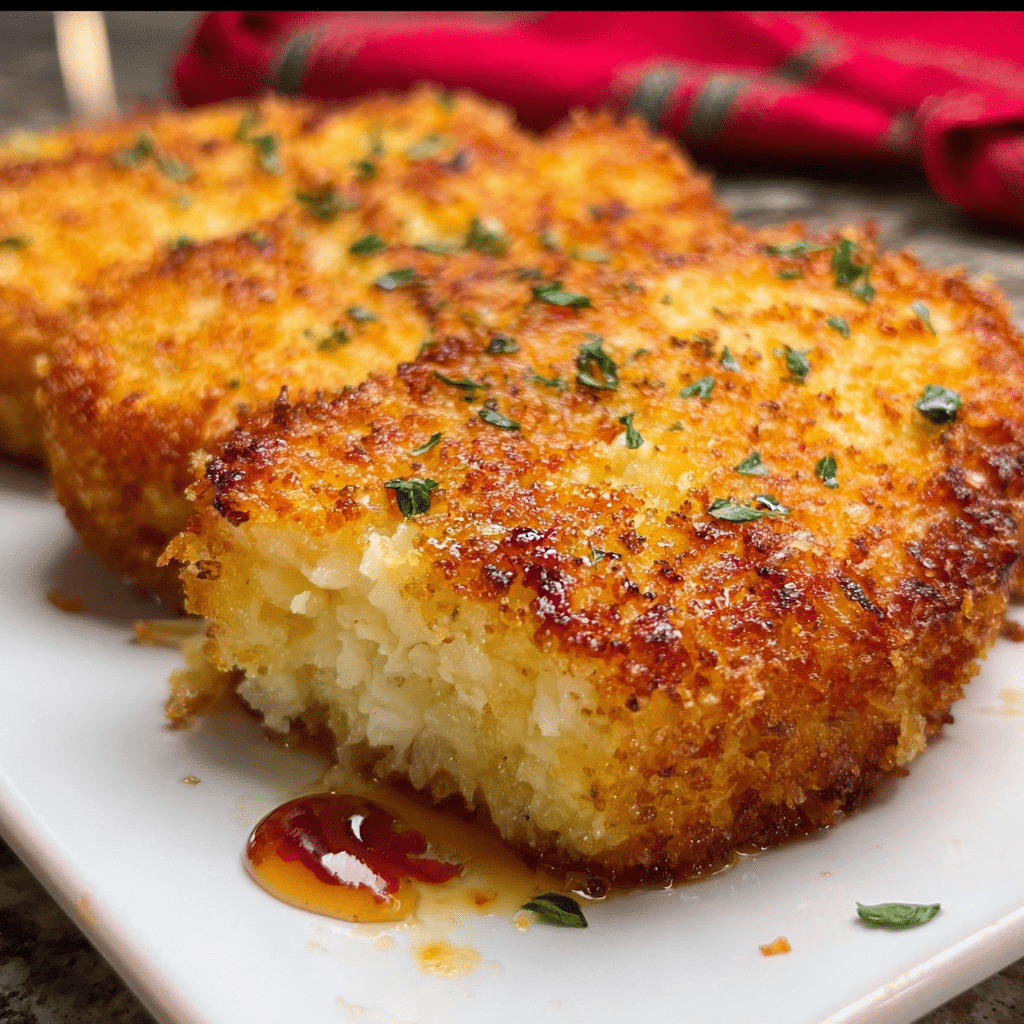
This recipe promises to transform your relationship with grits forever. These golden, crispy-on-the-outside, creamy-on-the-inside cakes are pure Southern comfort with a gourmet twist that’ll have your family begging for seconds.
Hey there! I’m Emeli, and over my years of training in professional kitchens and exploring street food around the world, I’ve learned that the most memorable dishes often come from the humblest ingredients. During my culinary journey, I discovered that grits when treated with respect and creativity can be absolutely magical.
In this guide, we’ll cover everything you need to know: selecting the right grits, mastering the perfect texture, achieving that golden crust, and serving suggestions that’ll elevate your entire meal.
Why This Cheesy Fried Grit Cakes Recipe Works
What makes these cheesy fried grit cakes absolutely irresistible? It’s all about the perfect balance of flavor, texture, and convenience that fits perfectly into any home cook’s repertoire.
• Uses pantry-friendly ingredients – No exotic items needed, just quality basics you likely already have • Make-ahead friendly – Prep the grits hours ahead and fry when ready to serve • Perfect for any occasion – Elegant enough for brunch parties, comforting enough for weeknight dinners • Foolproof technique – My double-coating method guarantees that perfect crispy exterior every time
Choosing the Right Grits for Cheesy Fried Grit Cakes
Best Grits for This Recipe
The foundation of exceptional cheesy fried grit cakes starts with selecting the right grits. For this recipe, instant grits work beautifully because they create the perfect consistency for molding and frying. The quick-cooking nature ensures a smooth, creamy texture that holds together beautifully when chilled.
Stone-ground grits can be substituted but will require longer cooking times and more liquid. The key is achieving that perfect balance creamy enough to be luxurious, firm enough to hold its shape when fried.
Buying Tips
Look for instant grits in the cereal aisle of your grocery store. Brands like Quaker or Jim Dandy work perfectly for this recipe. Avoid flavored varieties we want that pure corn flavor to shine through and complement our cheese.
Substitutions
While traditional yellow or white corn grits are ideal, you can experiment with polenta for a slightly different texture. For those avoiding corn, cauliflower-based alternatives exist, though the texture will be notably different.
Ingredients & Prep for Cheesy Fried Grit Cakes
Essential Ingredients Breakdown
For the Grits Base:
- 2 cups milk (creates richness and prevents grittiness)
- 2 cups water (helps achieve proper consistency)
- ¼ teaspoon salt (enhances all flavors)
- 1 cup instant grits (the star of our show)
- ½ teaspoon pepper (adds subtle heat)
- ½ cup shredded sharp cheddar cheese (provides tangy depth)
For the Coating:
- 3 eggs (binding agent for our coating)
- 2 tablespoons milk (creates smooth egg wash)
- 2 cups Panko breadcrumbs (superior crunch factor)
- 1 tablespoon Creole seasoning (adds that Southern kick)
Prep Essentials
The secret to restaurant-quality cheesy fried grit cakes lies in proper preparation. Start by gathering all ingredients and ensuring your baking dish is ready for the hot grit mixture. The chilling step is non-negotiable this is what transforms loose grits into sliceable, fryable cakes.
Pro Prep Tips
Set up your breading station before you begin cutting the chilled grits. This assembly-line approach prevents mess and ensures even coating on every cake. Room temperature eggs create a smoother wash, while properly seasoned breadcrumbs add flavor in every bite.
Step-by-Step Cooking Instructions for Cheesy Fried Grit Cakes
Pre-Cooking Prep for Cheesy Fried Grit Cakes
Begin by heating your milk and water mixture in a large saucepan over medium-high heat. Watch carefully milk can scorch quickly. When you see the first signs of simmering, reduce heat immediately. This gentle approach prevents lumps and ensures silky-smooth grits.
Cooking Method for Cheesy Fried Grit Cakes
- Create the Base: Once simmering, gradually whisk in grits to prevent clumping. Cover and cook for 5 minutes, stirring occasionally.
- Add Flavor: Remove from heat and fold in cheese and pepper until completely melted and incorporated.
- Set the Foundation: Spread mixture into your prepared baking dish, cover with plastic wrap, and refrigerate for 3 hours minimum.
- Prepare for Frying: Heat oil to 350°F in your skillet this temperature ensures crispy exteriors without burning.
Doneness Check for Cheesy Fried Grit Cakes
Your grits are ready when they’re completely set and can be cut cleanly with a cookie cutter. When frying, look for that beautiful golden-brown color typically 2-3 minutes per side. The internal temperature should remain hot and creamy while the exterior crisps perfectly.
Resting for Cheesy Fried Grit Cakes
Allow fried cakes to rest on paper towels for 2-3 minutes. This brief resting period helps excess oil drain while maintaining that perfect crispy texture we’ve worked so hard to achieve.
Pro Tips for Perfect Cheesy Fried Grit Cakes
Avoiding Soggy or Burnt Cheesy Fried Grit Cakes
Temperature control is everything. Too hot, and you’ll burn the breadcrumbs before the center warms. Too cool, and they’ll absorb oil and become greasy. Maintain steady medium heat and don’t overcrowd your pan this ensures even cooking and prevents temperature drops.
Tool Recommendations for Cheesy Fried Grit Cakes
A candy thermometer takes the guesswork out of oil temperature. Round cookie cutters create uniform cakes that cook evenly. A slotted spatula makes flipping easy without breaking these delicate beauties.
Storage & Reheating for Cheesy Fried Grit Cakes
Leftover grits (before frying) can be refrigerated for up to 3 days. Fried cakes are best enjoyed immediately, but can be reheated in a 350°F oven for 5-7 minutes to restore crispiness.
Flavor Variations for Cheesy Fried Grit Cakes
Spicy Twist
Add ½ teaspoon cayenne pepper to your grits mixture, or incorporate diced jalapeños for texture and heat. Hot honey drizzled over the finished cakes creates an addictive sweet-heat combination.
International Inspiration
Try smoked gouda instead of cheddar for a sophisticated twist, or add fresh herbs like thyme or rosemary. For a Mexican variation, use pepper jack cheese and add cumin to your breadcrumb mixture.
Dietary Adaptations
Flavor Variation Comparison Table:
| Variation | Cheese Swap | Seasoning Addition | Serving Style |
|---|---|---|---|
| Classic Southern | Sharp Cheddar | Creole seasoning | With honey or syrup |
| Smoky BBQ | Smoked Gouda | Paprika + garlic powder | With BBQ sauce drizzle |
| Mediterranean | Feta + Parmesan | Dried oregano + basil | With marinara dip |
| Tex-Mex | Pepper Jack | Cumin + chili powder | With avocado crema |
| Herb Garden | Gruyere | Fresh thyme + rosemary | With herb aioli |
Serving Suggestions for Cheesy Fried Grit Cakes
These versatile cheesy fried grit cakes shine in multiple serving scenarios. For brunch, serve alongside crispy bacon and fresh fruit. As a dinner side, they pair beautifully with grilled chicken or blackened fish. For an appetizer, serve smaller portions with various dipping sauces.
Consider pairing with crisp white wines like Sauvignon Blanc or light lagers that won’t overpower the delicate corn and cheese flavors. For non-alcoholic options, sweet tea or sparkling water with lemon complement the richness perfectly.
FAQs for Cheesy Fried Grit Cakes
Can I make cheesy fried grit cakes ahead of time? Absolutely! The unfried grits can be made up to 2 days ahead and kept refrigerated. Fry just before serving for best results.
What if my grit mixture is too loose to cut? This usually means insufficient chilling time. Refrigerate for another hour, or add an extra egg to help bind the mixture.
Can I bake these instead of frying? Yes! Brush with melted butter and bake at 425°F for 15-20 minutes, flipping once halfway through.
Are cheesy fried grit cakes gluten-free? Not with traditional Panko breadcrumbs. Substitute with gluten-free breadcrumbs or crushed cornflakes for a gluten-free version.
Conclusion
Fire up that skillet and treat yourself to these incredible cheesy fried grit cakes tonight! There’s something magical about transforming simple grits into these golden, crispy masterpieces that bring families together around the dinner table.
Join the thousands of home cooks who’ve discovered that grits can be so much more than a simple side dish. These cakes represent everything I love about cooking taking humble ingredients and creating something extraordinary that brings joy to every bite.
Ready for your next Southern-inspired adventure? Try our [Buttermilk Biscuits with Honey Butter] or explore our [Cast Iron Cornbread Guide] to complete your comfort food repertoire!
If you enjoyed this recipe, be sure to share it with your friends or save it for later! I’d love to see your unique twist feel free to post your photos on Pinterest!
Print
Cheesy Fried Grit Cakes Recipe
- Total Time: 30 minutes
- Yield: 6 servings
Description
These Cheesy Fried Grit Cakes are a fun take on a classic Southern Recipe. Fried to a perfect golden brown, they are perfect for Breakfast, Lunch, Dinner or even an Appetizer!
Ingredients
2 cups milk to simmer with water.
2 cups water
¼ teaspoon salt
1 cup instant grits
½ teaspoon pepper
½ cup shredded sharp cheddar cheese
3 eggs
2 tablespoons milk to add to eggs and breadcrumb coating later.
2 cups Panko breadcrumbs
1 tablespoon Creole seasoning
oil (enough to for about 1/2 inch in your fry pan)
Instructions
Heat 2 cups of milk, water, and salt in a large saucepan over medium high heat.
When the milk begins to simmer, reduce heat and stir in the grits. Cover and cook until thickened, around 5 minutes.
Remove from heat and stir in the shredded cheese and pepper until well combined.
Spread the mixture into a baking dish and chill for 3 hours, until set.
When ready to fry, heat the oil in a large skillet over medium heat.
Whisk together the eggs and tbsp milk in a shallow dish. In a separate dish, mix together the breadcrumbs and Creole seasoning.
Use a round cookie cutter to cut out the grits.
Dip each grits cake in the egg mixture, then the breadcrumb mixture. Repeat the process again, dipping in the egg mixture and then breadcrumbs. Continue dipping all the grits cakes in the egg and breadcrumbs until they’re all coated.
Place the coated grits cakes in the hot oil and cook each side until browned, between two and three minutes on each side. Transfer to a paper-towel lined plate to cool slightly before serving.
- Prep Time: 15 minutes
- Cook Time: 15minutes
- Category: Appetizer, Breakfast, Main Course
- Cuisine: American
Nutrition
- Serving Size: 6 Cakes
- Calories: 210kcal
Keywords: Cheesy Fried Grit Cakes