
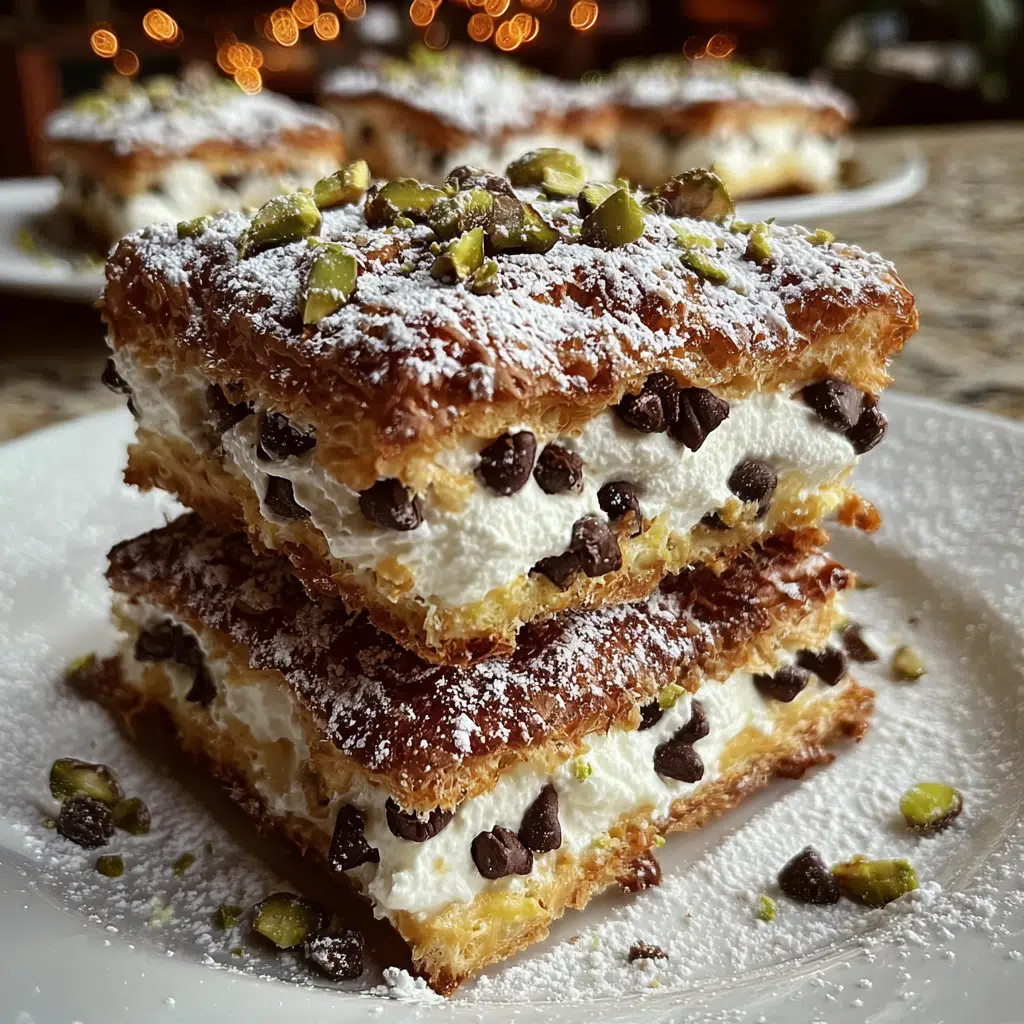
Classic cannoli squares are about to become your new favorite dessert shortcut. Picture this: I was rushing to prepare for a dinner party last month when disaster struck—my traditional cannoli shells cracked right before guests arrived. In that moment of kitchen panic, I grabbed my pie crusts and transformed the beloved cannoli filling into these brilliant squares. The result? Pure magic.
As someone who’s spent years perfecting Italian-American desserts in both professional kitchens and my home, I can promise you this: these classic cannoli squares deliver all the creamy, sweet satisfaction of traditional cannoli without the fussy shell-making process. You’ll discover the secrets to perfect ricotta filling, foolproof baking techniques, and creative variations that will have your family begging for the recipe.
Why This Classic Cannoli Squares Recipe Works
This recipe revolutionizes the traditional cannoli experience by combining convenience with authentic Italian flavors. Here’s what makes these classic cannoli squares absolutely irresistible:
• Uses simple, accessible ingredients – No specialty cannoli shells or hard-to-find items required • Ready in under an hour – From prep to plate, including cooling time • Perfect for feeding a crowd – One pan serves 9-12 people effortlessly • Foolproof technique – Even beginner bakers achieve bakery-quality results • Make-ahead friendly – Actually tastes better the next day
Choosing the Right Ingredients for Classic Cannoli Squares
Best Ricotta for This Recipe
The foundation of exceptional classic cannoli squares lies in selecting premium ricotta cheese. Whole milk ricotta creates the richest, creamiest texture that mimics traditional cannoli filling perfectly. Look for ricotta with minimal liquid separation in the container—this indicates fresher cheese with better consistency.
Buying Tips for Success
When shopping for your classic cannoli squares ingredients, choose ricotta that feels heavy for its size and has a bright white color. Avoid any containers with excessive liquid pooling on top. For the pie crusts, refrigerated versions work better than frozen, as they’re easier to handle and less likely to crack.
Smart Substitutions
Transform your classic cannoli squares to match dietary needs: swap powdered sugar for coconut sugar (use the same amount), replace mini chocolate chips with sugar-free alternatives, or substitute traditional pie crust with almond flour crusts for keto-friendly versions.
Ingredients & Prep for Classic Cannoli Squares
Essential Filling Components
The heart of perfect classic cannoli squares starts with properly preparing your ricotta. If your ricotta seems watery, drain it through a fine-mesh strainer for 15-20 minutes before mixing. This extra step prevents soggy squares and ensures that signature dense, creamy texture.
Flavor Enhancement Secrets
Elevate your classic cannoli squares by letting the filling rest for 30 minutes after mixing. This allows the vanilla and cinnamon to bloom while the chocolate chips distribute evenly. For deeper flavor, add a pinch of orange zest or a tablespoon of rum extract to the ricotta mixture.
Crust Preparation Essentials
Success with classic cannoli squares depends on proper crust handling. Remove pie crusts from refrigeration 10 minutes before use—they’ll be pliable enough to work with but still firm enough to hold their shape. Keep unused crust covered to prevent drying.
Step-by-Step Cooking Instructions for Classic Cannoli Squares
1. Pre-Cooking Prep for Classic Cannoli Squares
Begin by preheating your oven to 375°F (190°C). Line your 9×9-inch baking dish with parchment paper for easy removal. In a large mixing bowl, combine ricotta cheese, powdered sugar, vanilla extract, cinnamon, and mini chocolate chips. Whisk until completely smooth—this takes about 2-3 minutes of vigorous mixing.
2. Assembly Method for Classic Cannoli Squares
Unroll your first pie crust and gently press it into the prepared baking dish, ensuring it covers the bottom completely and comes up the sides about ½ inch. Pour the ricotta mixture over the crust, spreading evenly with an offset spatula. Place the second crust over the filling, pressing edges to seal completely.
3. Baking Process for Classic Cannoli Squares
Brush the top crust with beaten egg wash and sprinkle generously with granulated sugar for that golden, bakery-style finish. Using a sharp knife, cut three small steam vents in the top crust. Bake for 30-35 minutes until the crust turns golden brown and the filling is set when gently jiggled.
4. Cooling Technique for Classic Cannoli Squares
Remove from oven and let cool completely in the pan for at least 30 minutes—this crucial step prevents the filling from oozing when cut. For clean slices, refrigerate for an additional hour before cutting into squares using a sharp knife wiped clean between cuts.
Pro Tips for Perfect Classic Cannoli Squares
Achieving Ideal Texture in Classic Cannoli Squares
The secret to restaurant-quality classic cannoli squares lies in moisture control. If your ricotta seems too wet, strain it overnight in cheesecloth. Conversely, if the mixture appears too thick, add one tablespoon of heavy cream. Temperature matters too—ensure all ingredients are at room temperature for the smoothest blend.
Essential Tool Recommendations for Classic Cannoli Squares
Invest in a quality offset spatula for spreading the filling evenly, and use a pastry brush for the perfect egg wash application. A bench scraper helps achieve clean, professional-looking edges when cutting your classic cannoli squares.
Storage & Make-Ahead Strategy for Classic Cannoli Squares
Store classic cannoli squares covered in the refrigerator for up to 4 days. For longer storage, wrap individual squares in plastic wrap and freeze for up to 2 months. Thaw overnight in the refrigerator before serving—the texture actually improves after a day of chilling.
Flavor Variations for Classic Cannoli Squares
International Twist on Classic Cannoli Squares
Transform your classic cannoli squares with global flavors: add matcha powder for a Japanese-inspired version, fold in dulce de leche for Latin flair, or incorporate rose water and pistachios for a Middle Eastern touch.
Dietary-Friendly Classic Cannoli Squares
Create keto-friendly classic cannoli squares using almond flour crusts and sugar-free sweeteners. For dairy-free versions, substitute ricotta with cashew cream cheese. Gluten-free options work beautifully with almond flour or gluten-free pie crust alternatives.
Seasonal Adaptations for Classic Cannoli Squares
Embrace seasonal flavors in your classic cannoli squares: add pumpkin puree and warm spices for fall, incorporate lemon zest and blueberries for summer, or fold in eggnog and nutmeg for holiday celebrations.
| Variation | Key Ingredient | Prep Time | Special Notes |
|---|---|---|---|
| Chocolate Lovers | ¼ cup cocoa powder + extra chips | 15 min | Reduce powdered sugar by 2 tbsp |
| Citrus Burst | 2 tbsp lemon/orange zest | 12 min | Add 1 tbsp citrus juice |
| Nutty Delight | ½ cup chopped toasted nuts | 18 min | Toast nuts for 5 min first |
| Spiced Holiday | 1 tsp pumpkin pie spice | 10 min | Perfect for fall/winter |
Serving Suggestions for Classic Cannoli Squares
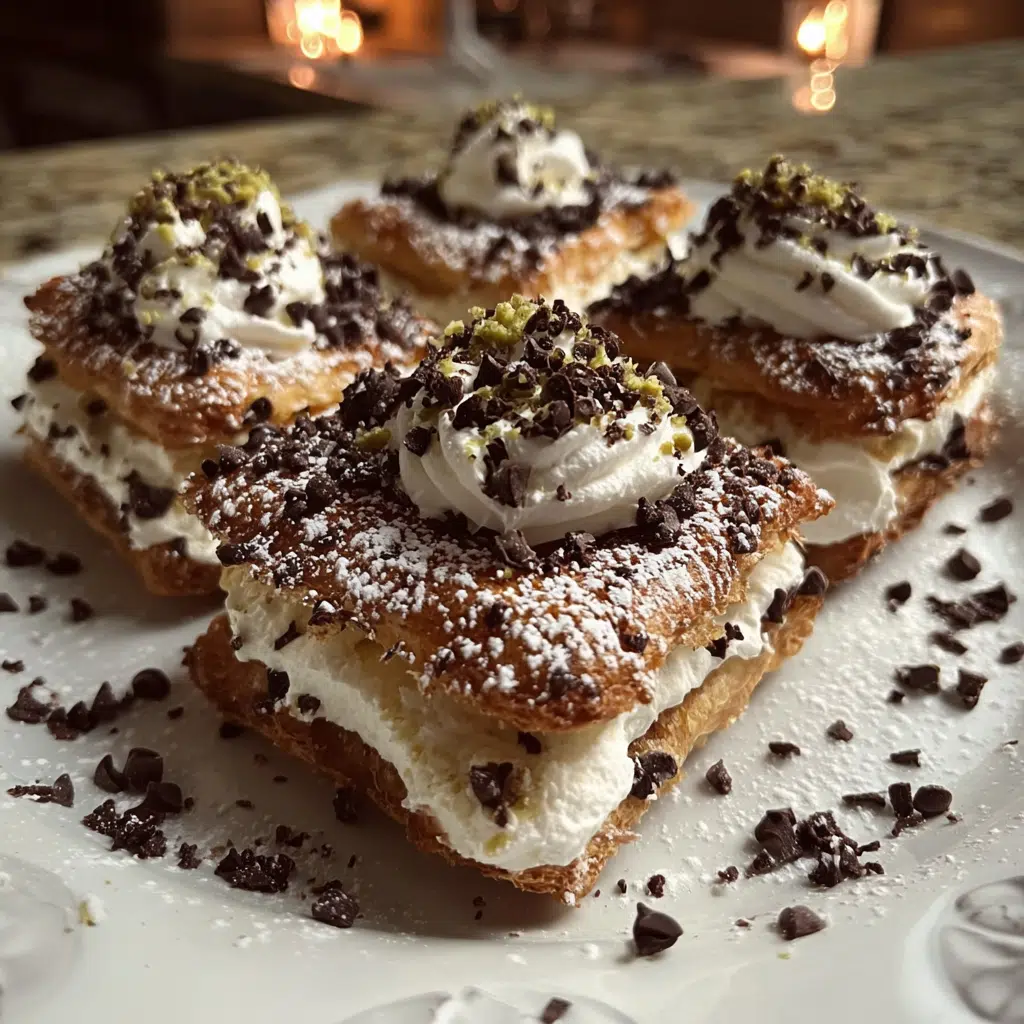
Present your classic cannoli squares with Italian-inspired accompaniments that complement the rich ricotta filling. Dust with powdered sugar just before serving, and arrange on a platter garnished with fresh berries and mint sprigs. For special occasions, drizzle with melted dark chocolate or serve alongside espresso for an authentic Italian experience.
Pair classic cannoli squares with dessert wines like Moscato d’Asti or Vin Santo, which enhance the creamy sweetness without overwhelming the delicate flavors. For non-alcoholic options, serve with strong Italian coffee or creamy cappuccino that balances the dessert’s richness perfectly.
FAQs for Classic Cannoli Squares
Can I make classic cannoli squares ahead of time? Absolutely! Classic cannoli squares actually taste better after chilling overnight. The flavors meld beautifully, and the texture becomes perfectly set. Store covered in the refrigerator for up to 4 days.
What if my ricotta is too watery for classic cannoli squares? Strain watery ricotta through cheesecloth or a fine-mesh strainer for 30 minutes to 2 hours before using. This prevents soggy classic cannoli squares and ensures the proper creamy consistency.
Can I freeze classic cannoli squares? Yes! Wrap individual squares tightly in plastic wrap, then place in freezer bags for up to 3 months. Thaw overnight in the refrigerator before serving—the texture remains excellent.
How do I prevent soggy bottom crusts in classic cannoli squares? Pre-bake the bottom crust for 5-7 minutes before adding filling, or brush with beaten egg white as a moisture barrier. Ensure your ricotta isn’t too wet before assembly.
Conclusion
These classic cannoli squares prove that the best recipes often come from kitchen mishaps turned into magnificent discoveries. You’ve now mastered a dessert that combines the beloved flavors of traditional cannoli with the convenience of a one-pan wonder. The creamy ricotta filling, perfectly balanced sweetness, and flaky crust create pure dessert magic in every bite.
Ready to create dessert magic in your own kitchen? Gather your ingredients and try these classic cannoli squares tonight—your family will be requesting them for every special occasion! Share your creations with me on social media using #FoodFansyDesserts, and join the thousands of home bakers who’ve fallen in love with this game-changing recipe.
If you enjoyed this recipe, be sure to share it with your friends or save it for later!
I’d love to see your unique twist—feel free to post your photos on Pinterest!
Print
Classic Cannoli Squares
- Total Time: 45-50 minutes
- Yield: 16 squares
- Diet: Vegetarian
Description
Delicious and easy-to-make cannoli squares filled with a rich ricotta filling and topped with a flaky crust.
Ingredients
2 cups Ricotta Cheese (preferably whole milk)
1 cup Powdered Sugar (or coconut sugar)
1 teaspoon Vanilla Extract (preferably pure)
1/2 teaspoon Cinnamon (optional)
1/2 cup Mini Chocolate Chips
2 pre-made pie crusts (or homemade)
1 large Egg (for egg wash)
Sugar (for sprinkling)
1/4 cup Chopped Pistachios (for garnish)
3 pieces Maraschino Cherries (for garnish)
1/4 cup Extra Chocolate Chips (for garnish)
Instructions
- In a mixing bowl, combine 2 cups of ricotta cheese, 1 cup of powdered sugar, 1 teaspoon of vanilla extract, ½ teaspoon of cinnamon, and ½ cup of mini chocolate chips. Whisk until smooth.
- Preheat your oven to 375°F (190°C).
- Unroll one pre-made pie crust and fit it into a 9×9-inch baking dish.
- Spoon the ricotta mixture over the pie crust evenly.
- Place the second pie crust over the filling, sealing the edges. Brush with beaten egg and sprinkle with sugar.
- Bake for 30-35 minutes until golden brown.
- Allow to cool for at least 30 minutes before cutting into squares.
Notes
- For a richer filling, use whole milk ricotta.
- You can substitute powdered sugar with coconut sugar for a healthier option.
- Feel free to omit cinnamon for a traditional cannoli flavor.
- Garnishes can be adjusted according to personal taste.
- Category: Desssert
- Cuisine: Italian
Nutrition
- Serving Size: 1 square
- Calories: 180kcal
- Sugar: 12g
- Sodium: 120mg
- Fat: 8g
- Saturated Fat: 3g
- Unsaturated Fat: 5g
- Trans Fat: 0g
- Carbohydrates: 23g
- Fiber: 1g
- Protein: 4g
- Cholesterol: 30mg
Keywords: Classic Cannoli Squares