
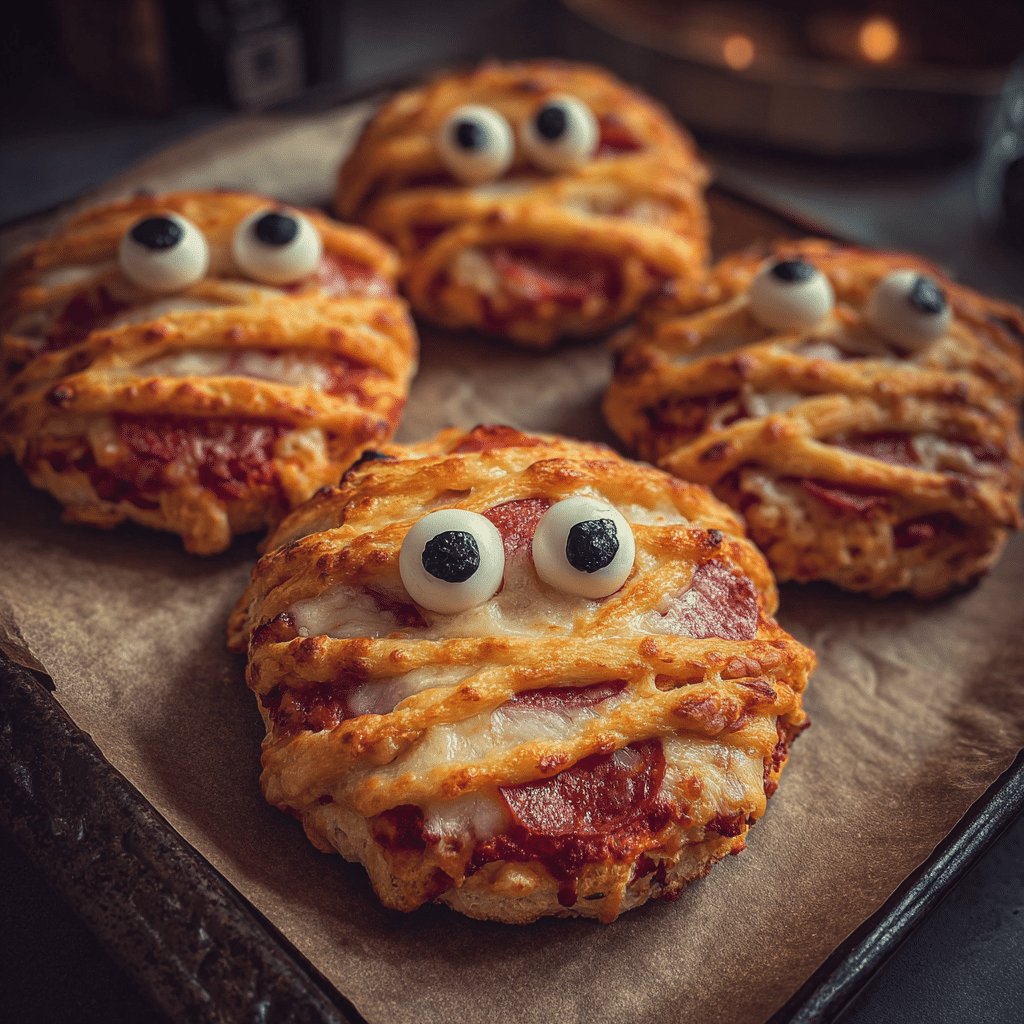
Mini Mummy Pizzas saved my Halloween party last year when I had 15 hungry kids arriving in 30 minutes. As a chef who’s juggled professional kitchens and home cooking chaos, I know the panic of needing something quick, fun, and actually delicious. That’s when I grabbed English muffins and mozzarella, and these adorable little monsters were born.
I’m Emeli, and here at FoodFansy, I believe the best recipes bring joy without stress. These Mini Mummy Pizzas deliver exactly that: they’re ready in minutes, kids can help make them, and they disappear faster than candy on trick-or-treat night. Whether you’re a Halloween enthusiast or just need a fun weeknight dinner, this recipe has you covered.
In this guide, I’ll walk you through why this recipe works magic, how to choose your ingredients, step-by-step assembly tips, creative variations, and answers to all your questions. Let’s make Halloween deliciously simple.
Why This Mini Mummy Pizzas Recipe Works
These aren’t just cute they’re genuinely tasty and incredibly practical. Here’s why Mini Mummy Pizzas have become my go-to October recipe:
- Uses pantry staples you already have: English muffins, pizza sauce, and mozzarella are weeknight essentials
- Assembly takes literally 5 minutes: No complicated techniques or special skills required
- Kid-friendly and interactive: Little hands can wrap the “bandages” while you supervise the oven
- Customizable for picky eaters: Everyone can add their favorite toppings before the mozzarella wrapping
- Perfect for parties or quick dinners: Scale up or down effortlessly I’ve made 8 or 80 with equal ease
Choosing the Right Ingredients for Mini Mummy Pizzas
The beauty of Mini Mummy Pizzas lies in their simplicity, but choosing quality ingredients makes them shine.
Best Base Options for Mini Mummy Pizzas
English muffins are my top choice for their nooks and crannies that catch the sauce, plus they stay crispy. However, you have options:
- English muffins: Traditional choice with perfect texture and size
- Bagels: Heartier base for bigger appetites (slice them thinner for best results)
- Pita bread: Creates a crispier, thinner crust
- Small tortillas: For a gluten-light option that gets extra crispy
Cheese Selection Tips for Mini Mummy Pizzas
The mozzarella is your star player here. String cheese is actually my secret weapon it’s pre-portioned and pulls apart into perfect “bandage” strips. Otherwise, use low-moisture mozzarella that you can slice thinly. Avoid pre-shredded bags for this recipe; they won’t create those clean mummy wrap lines.
Pantry Staples You’ll Need
Keep these basics on hand for spontaneous Mini Mummy Pizzas:
- Pizza sauce or marinara: Any jarred variety works; I love ones with garlic
- Black olives: Essential for those spooky eyes
- Olive oil spray: Creates golden, crispy edges
- Italian seasoning: Optional but adds aromatic depth
Ingredients & Prep for Mini Mummy Pizzas
Let me break down exactly what you need and how to prepare your ingredients for success.
Essential Ingredients for Mini Mummy Pizzas
- 4 English muffins, halved (creates 8 mini pizzas)
- ½ cup pizza sauce
- 1 cup shredded or string mozzarella cheese (cut into thin strips)
- 8 sliced black olives (for eyes)
Pantry Staples for Mini Mummy Pizzas
- Olive oil spray
- Dried oregano or Italian seasoning (optional)
Prep Steps for Mini Mummy Pizzas
- Preheat your oven to 375°F (190°C) this moderate temperature melts cheese without burning edges
- Line a baking tray with parchment paper for easy cleanup
- Prepare your cheese strips: If using string cheese, peel into thin strands. If using block mozzarella, slice into ⅛-inch strips about 2-3 inches long
- Slice your olives: Each olive should yield 2-3 rounds for eyes
- Arrange muffin halves on the prepared tray, cut side up
Step-by-Step Cooking Instructions for Mini Mummy Pizzas
Follow these simple steps for perfectly spooky Mini Mummy Pizzas every time.
Pre-Cooking Prep for Mini Mummy Pizzas
Start by brushing each muffin half lightly with olive oil. This isn’t just about flavor it creates a barrier that keeps your base crispy instead of soggy, and gives you those beautiful golden edges that make these pizzas irresistible.
Cooking Method for Mini Mummy Pizzas
- Sauce application: Spread a generous spoonful of pizza sauce on each muffin half, leaving a small border around the edges. Don’t overfill about 1 tablespoon per half is perfect.
- Create the mummy wrappings: This is where the magic happens! Layer your mozzarella strips in a crisscross pattern across the sauce, overlapping randomly to mimic authentic mummy bandages. Leave small gaps for that wrapped effect. Pro tip: slight messiness looks more authentic than perfect lines.
- Add the eyes: Place two olive slices near the top of each pizza, spacing them like eyes. Press them gently into the cheese so they don’t slide off.
- Bake: Place your tray in the preheated oven and bake for 10–12 minutes. You’re looking for bubbly, melted cheese and golden-brown edges on the muffins.
Doneness Check for Mini Mummy Pizzas
Your Mini Mummy Pizzas are ready when the cheese has melted completely and bubbles slightly around the edges. The muffin base should feel crisp when you gently lift one with a spatula. If the cheese hasn’t fully melted but the edges are browning, tent with foil for the last 2 minutes.
Resting Mini Mummy Pizzas
Let your pizzas cool for 2–3 minutes before serving. This isn’t just about protecting mouths from molten cheese it allows the cheese to set slightly, making the pizzas easier to handle and giving those mozzarella bandages better definition.
Pro Tips for Perfect Mini Mummy Pizzas
After making these dozens of times, I’ve learned tricks that take Mini Mummy Pizzas from good to unforgettable.
Avoiding Soggy Bases in Mini Mummy Pizzas
The cardinal sin of mini pizzas is a soggy bottom. Here’s how I prevent it:
- Toast muffins lightly first: Pop them in the oven for 2-3 minutes before adding toppings if you want extra insurance
- Don’t overload sauce: More isn’t better here; a thin layer is plenty
- Use low-moisture mozzarella: Regular mozzarella releases too much water
- Brush with olive oil: That protective layer is crucial
Tool Recommendations for Mini Mummy Pizzas
You don’t need special equipment, but these make life easier:
- Pastry brush: For applying olive oil evenly
- Pizza cutter or sharp knife: For creating uniform cheese strips
- Parchment paper: Non-stick surface plus easy cleanup
- Cooling rack: Helps air circulate underneath after baking
Storage & Reheating Mini Mummy Pizzas
Mini Mummy Pizzas are best fresh, but life happens:
- Refrigerate leftovers: Store in an airtight container for up to 2 days
- Reheat in the oven: 350°F for 5-7 minutes brings back that crispy texture (avoid microwaves they make things rubbery)
- Freeze before baking: Assemble pizzas, freeze on a tray, then transfer to freezer bags. Bake from frozen, adding 3-5 extra minutes
- Make-ahead tip: Prep toppings the night before and assemble just before baking
Flavor Variations for Mini Mummy Pizzas
The classic version is perfect, but Mini Mummy Pizzas are incredibly versatile. Here are my favorite twists.
Spicy Mummy Pizzas
Add some heat for adult palates:
- Mix ½ teaspoon red pepper flakes into your pizza sauce
- Drizzle with sriracha or hot honey before serving
- Use pepper jack cheese instead of mozzarella for spicy “bandages”
Protein-Packed Mini Mummy Pizzas
Make them more substantial:
- Add cooked crumbled sausage or pepperoni under the cheese
- Sprinkle with cooked bacon bits
- Layer thin ham slices before wrapping with mozzarella
Veggie-Loaded Mini Mummy Pizzas
Sneak in nutrition:
- Finely dice bell peppers or mushrooms into the sauce
- Add spinach leaves under the cheese
- Use sun-dried tomatoes for extra flavor
Dietary Adaptations
| Dietary Need | Adaptation | Notes |
|---|---|---|
| Gluten-Free | Use gluten-free English muffins or rice cakes | Check that pizza sauce is certified GF |
| Dairy-Free | Swap with dairy-free mozzarella shreds | Violife or Miyoko’s brands work well |
| Vegan | Use vegan mozzarella + nutritional yeast | Add garlic powder for extra flavor |
| Low-Carb/Keto | Replace muffins with portobello mushroom caps | Scrape out gills first; baking time may vary |
| Nut-Free | Recipe is naturally nut-free | Just verify sauce ingredients |
Serving Suggestions for Mini Mummy Pizzas
Mini Mummy Pizzas are a complete snack, but here’s how to build a full Halloween spread around them.
Side Dish Pairings
- “Witches’ Fingers” veggie sticks: Carrot and celery sticks with ranch dip
- Graveyard salad: Mixed greens with tombstone-shaped croutons
- Roasted pumpkin wedges: Season with paprika and serve with garlic aioli
- Sweet potato “monster” fries: Baked fries with googly-eye olive decorations
Beverage Pairings
For a fun party spread:
- Kids: Orange juice “potion,” apple cider, or chocolate milk in Halloween cups
- Adults: Amber ales complement the tomato and cheese beautifully, or try a light Pinot Noir
- Non-alcoholic: Sparkling apple cider with cinnamon sticks
Presentation Ideas
Make serving special:
- Arrange on a black platter with plastic spiders for effect
- Serve on individual “tombstone” plates (gray cardstock cutouts)
- Add dry ice to the serving area for spooky fog (keep away from food)
- Label with cute tent cards: “Mummy’s Revenge” or “Wrapped with Love”
FAQs About Mini Mummy Pizzas
Can I use frozen English muffins?
Absolutely! No need to thaw just add 1-2 extra minutes to baking time. Mini Mummy Pizzas are actually perfect for using up freezer staples.
How do I prevent the cheese from sliding off?
Press your mozzarella strips gently into the sauce as you arrange them. Also, avoid moving the pizzas around too much before the cheese sets in the oven. If your cheese is very dry, a light mist of water before baking helps it melt and adhere better.
Can I make these in an air fryer?
Yes! Air fry Mini Mummy Pizzas at 350°F for 6-8 minutes. Watch closely air fryers vary significantly in temperature. This method creates an extra-crispy base.
Are Mini Mummy Pizzas safe for young children?
Yes, but supervise closely. Wait the full 2-3 minutes for cooling, and test temperature yourself first. For toddlers, cut into smaller pieces and remove the olive eyes if they’re a choking concern. The recipe contains no raw ingredients or common allergens beyond dairy and gluten.
What if I don’t have black olives?
Get creative with the eyes! Try:
- Small slices of pepperoni
- Dots of black sesame seeds
- Small pieces of sun-dried tomato
- Capers (for a salty kick)
- Even small chocolate chips work in a pinch for a sweet-savory surprise
How many pizzas should I plan per person?
For kids: 2-3 mini pizzas (1-1.5 muffins) For adults as appetizers: 2-3 mini pizzas As a main course: 4-6 mini pizzas per person This recipe makes 8 mini pizzas, perfect for 3-4 kids or 2-3 adults.
Can I use homemade pizza sauce?
Definitely! Homemade sauce takes Mini Mummy Pizzas to the next level. Just ensure it’s thick enough watery sauce leads to soggy bases. Simmer your sauce to reduce excess moisture if needed.
What’s the best way to cut cheese strips evenly?
Use a sharp knife and a ruler for precision, or eyeball it for a more authentic “weathered bandage” look. Honestly, inconsistent strips look more realistic. If you’re using string cheese, just pull it apart naturally the irregular strands are perfect.
Conclusion
Mini Mummy Pizzas prove that the best recipes don’t need hours or fancy ingredients just a little creativity and love. In under 15 minutes from start to finish, you can create something that brings genuine smiles and feeds hungry monsters of all ages.
Since adding these to my Halloween rotation, they’ve become a FoodFansy favorite requested year-round for movie nights, birthday parties, and “just because” dinners. That’s the power of food that’s both fun and delicious.
If you enjoyed this recipe, be sure to share it with your friends or save it for later! I’d love to see your unique twist feel free to post your photos on Pinterest!

Mini Mummy Pizzas – 5-Minute Fun Recipe for Halloween 🎃
- Total Time: 22 minutes
- Yield: 8 mini pizzas 1x
- Diet: Vegetarian
Description
Mini Mummy Pizzas are spooky, fun, and easy to make perfect for Halloween or family nights!
Ingredients
4 English muffins (halved)
1/2 cup pizza sauce
1 cup mozzarella cheese (cut into strips)
8 black olive slices
1 tsp olive oil
1/2 tsp dried oregano
Instructions
1. Preheat oven to 375°F (190°C).
2. Line a baking tray with parchment paper.
3. Spread pizza sauce over each muffin half.
4. Add cheese strips in crisscross patterns to resemble mummy wrappings.
5. Place olive slices as eyes.
6. Bake for 10–12 minutes until cheese melts and edges are golden.
7. Cool for 2–3 minutes before serving.
Notes
Use gluten-free bases for dietary needs.
Store leftovers in an airtight container and reheat in the oven for 5 minutes.
- Prep Time: 10 minutes
- Cook Time: 12 minutes
- Category: Snacks
- Method: Baking
- Cuisine: American
Nutrition
- Serving Size: 1 mini pizza
- Calories: 120
- Sugar: 2g
- Sodium: 180mg
- Fat: 5g
- Saturated Fat: 3g
- Unsaturated Fat: 2g
- Trans Fat: 0g
- Carbohydrates: 12g
- Fiber: 1g
- Protein: 6g
- Cholesterol: 15mg
Keywords: Mini Mummy Pizzas, Halloween snacks, easy pizza recipe