

Peanut Butter and Jelly Cookies brought me back to my childhood in the most unexpected way. Last spring, I was preparing for a dinner party when my niece walked into my kitchen and asked, “Aunt Emeli, can we make something fun?” She pointed to the jar of peanut butter on my counter and the homemade strawberry jam cooling on the windowsill. In that moment, inspiration struck why not transform the classic PB&J sandwich into a cookie that captures all that nostalgic magic?
As someone who’s spent years exploring global flavors and perfecting techniques in professional kitchens, I’ve learned that the best recipes often come from the simplest ideas. These Peanut Butter and Jelly Cookies prove that point beautifully. They’re soft, chewy, perfectly sweet, and filled with jammy goodness that takes you straight back to lunchbox days but elevated enough to serve at any gathering.
Here at FoodFansy, I believe cooking should bring joy, not stress. That’s why this recipe uses pantry staples, comes together in under 30 minutes, and delivers results that’ll make everyone ask for seconds. In this post, I’ll walk you through choosing the right ingredients, mastering the technique, avoiding common pitfalls, and customizing these cookies to match your taste preferences.
Why This Peanut Butter and Jelly Cookies Recipe Works
These aren’t your average cookies. After countless test batches (my family didn’t complain), I’ve perfected a recipe that hits all the right notes. Here’s what makes these Peanut Butter and Jelly Cookies irresistible:
- Uses affordable, pantry-friendly ingredients – No specialty items or hard-to-find components. Just creamy peanut butter, basic sugars, flour, and your favorite jelly.
- Ready in under 30 minutes – From mixing bowl to cooling rack, you’ll have fresh-baked cookies faster than you can say “lunchbox classic.”
- Soft and chewy texture guaranteed – The perfect balance of brown and granulated sugar creates that sought-after chewiness, while the peanut butter keeps them tender.
- Customizable for any occasion – Switch up the jelly flavors, add chocolate chips, or even try savory variations for adventurous palates.
- Kid-friendly and crowd-pleasing – Whether you’re baking with little ones or bringing treats to a potluck, these cookies win hearts every time.
Choosing the Right Ingredients for Peanut Butter and Jelly Cookies
The beauty of this recipe lies in its simplicity, but using quality ingredients makes all the difference. Let me guide you through selecting the best components for your Peanut Butter and Jelly Cookies.
Best Peanut Butter for This Recipe
Not all peanut butter is created equal when it comes to baking. For these cookies, stick with creamy, conventional peanut butter like Skippy or Jif. Natural peanut butter (the kind that separates) contains too much oil and not enough stabilizers, which can make your cookies spread too much and turn out greasy. The conventional varieties have the perfect texture and consistency to create that classic peanut butter cookie structure.
Selecting Your Jelly or Jam
This is where you can get creative! Traditional grape or strawberry jelly works beautifully, but don’t be afraid to experiment. Here are my top recommendations:
- Strawberry jam – Classic, sweet, and universally loved
- Raspberry preserves – Adds a tart brightness that balances the peanut butter
- Apricot jam – Sophisticated and slightly tangy
- Grape jelly – The ultimate nostalgic choice
- Olive jam – For a Mediterranean twist that’ll surprise and delight (trust me on this one!)
Pro tip: Avoid jellies that are too runny. Thicker jams and preserves stay put in the cookie indent better during baking.
Sugar Matters
The combination of brown sugar and granulated sugar isn’t arbitrary. Brown sugar contains molasses, which adds moisture and creates that chewy texture. Granulated sugar helps the cookies spread just enough and adds sweetness without extra moisture. Together, they’re the dream team.
Substitutions and Swaps
Peanut allergy? Use sunflower seed butter, almond butter, or cashew butter in equal amounts. Note that sunflower seed butter may turn the cookies slightly green due to a natural chemical reaction it’s harmless and doesn’t affect taste!
Egg-free option: Replace the egg with a flax egg (1 tablespoon ground flaxseed mixed with 3 tablespoons water, left to gel for 5 minutes).
Gluten-free: Swap the all-purpose flour for a 1:1 gluten-free baking flour blend.
Ingredients & Prep for Peanut Butter and Jelly Cookies
Cookie Dough Essentials
- 1 cup creamy peanut butter
- ½ cup brown sugar (packed)
- ½ cup granulated sugar
- 1 large egg
- 1 teaspoon vanilla extract
- 1 cup all-purpose flour
- ½ teaspoon baking soda
- ¼ teaspoon salt
Jelly Filling
- ½ cup jelly or jam of your choice
Prep Tips Before You Begin
Bring ingredients to room temperature: This is especially important for the egg. Room temperature ingredients blend together more smoothly, creating a more uniform dough and better texture. Take your egg out of the fridge 30 minutes before baking.
Measure flour correctly: Spoon flour into your measuring cup and level it off with a knife. Don’t scoop directly from the bag, as this packs the flour and you’ll end up with too much, leading to dry cookies.
Line your baking sheets: Parchment paper prevents sticking and ensures even browning. It’s a small step that makes cleanup infinitely easier.

Step-by-Step Cooking Instructions for Peanut Butter and Jelly Cookies
Let me walk you through each step of creating these delicious cookies. Follow along, and you’ll have perfect results every time.
Pre-Cooking Prep for Peanut Butter and Jelly Cookies
Preheat your oven to 350°F (175°C). Position the rack in the center of your oven for the most even heat distribution. Line two baking sheets with parchment paper and set them aside.
Gather all your ingredients and tools. You’ll need two mixing bowls (or one if you’re washing as you go), measuring cups and spoons, a whisk or electric mixer, and a small spoon or your thumb for creating indents.
Mixing the Dough for Peanut Butter and Jelly Cookies
In a large mixing bowl, combine the peanut butter, brown sugar, and granulated sugar. Using a hand mixer or sturdy wooden spoon, beat the mixture until it’s light and creamy about 2 minutes. You want the sugars to start dissolving into the peanut butter, creating a smooth, fluffy base.
Add the egg and vanilla extract. Beat until the mixture is completely smooth and well combined. The dough should look glossy and uniform.
In a separate bowl, whisk together the flour, baking soda, and salt. This ensures the leavening and salt are evenly distributed throughout the dough.
Add the dry ingredients to the peanut butter mixture. Stir gently until just combined. Don’t overmix stop as soon as you no longer see streaks of flour. Overmixing develops gluten, which can make your cookies tough instead of tender.
Shaping and Filling for Peanut Butter and Jelly Cookies
Scoop the dough into 1-inch balls (about 1 tablespoon each). Roll them between your palms to create smooth spheres. Place them on your prepared baking sheets, spacing them about 2 inches apart to allow for spreading.
Here’s the fun part: Using your thumb, the back of a small spoon, or even the rounded end of a wooden spoon, press a small indent into the center of each cookie. Make it deep enough to hold about ½ teaspoon of jelly, but don’t press all the way through to the pan.
Spoon or pipe about ½ teaspoon of jelly into each indent. Don’t overfill the jelly will bubble and spread during baking, and too much will overflow.
Baking the Peanut Butter and Jelly Cookies
Bake at 350°F (175°C) for 8 to 10 minutes. Watch them carefully during the last few minutes. You’re looking for edges that are just beginning to turn golden brown. The centers may look slightly underbaked that’s perfect!
Important timing note: These cookies continue cooking on the hot baking sheet after you remove them from the oven. If you bake them until they look completely done, they’ll end up overbaked and dry once they cool.
Doneness Check for Peanut Butter and Jelly Cookies
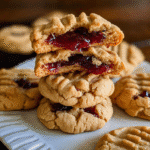
Your cookies are ready when the edges are set and lightly golden, but the centers still look soft and slightly underbaked. They should have a matte appearance rather than looking wet or shiny. The jelly will be bubbling that’s normal and adds to the jammy deliciousness.
If you gently touch the edge of a cookie, it should feel firm but not hard. The center will feel soft to the touch.
Cooling Your Peanut Butter and Jelly Cookies
This step is crucial for texture. Let the cookies cool on the baking sheet for 5 minutes. During this time, they’re finishing their baking process and firming up enough to be moved without breaking.
After 5 minutes, use a spatula to carefully transfer the cookies to a wire cooling rack. Let them cool completely before storing. I know it’s tempting to eat them warm (and one or two for quality control is absolutely acceptable), but they’ll be at their optimal texture once fully cooled.
Pro Tips for Perfect Peanut Butter and Jelly Cookies
After making these cookies dozens of times, I’ve learned a few tricks that guarantee success every time. Here are my insider secrets for achieving bakery-worthy Peanut Butter and Jelly Cookies.
Avoiding Common Mistakes with Peanut Butter and Jelly Cookies
Don’t skip the indent step: Some bakers try to add jelly after baking, but creating the indent before baking allows the cookie to form a natural well that keeps the jelly contained. Make your indents generous about ½ inch deep.
Prevent jelly overflow: If your jelly is particularly runny, refrigerate it for 30 minutes before filling the cookies. This helps it hold its shape better during the initial baking phase.
Watch your oven temperature: Every oven is different. If your cookies are spreading too much, your oven might be running hot. If they’re not spreading enough, it might be running cool. Consider using an oven thermometer to verify accuracy.
Consistent sizing matters: Use a cookie scoop to ensure all your cookies are the same size. This guarantees even baking no burnt edges while centers are still raw.
Essential Tools for Peanut Butter and Jelly Cookies
While this recipe is wonderfully simple, a few tools make the process even easier:
- Cookie scoop (1 tablespoon size): Creates uniform cookies that bake evenly
- Parchment paper or silicone baking mats: Prevents sticking without added grease
- Wire cooling rack: Allows air circulation for perfect cooling
- Small spoon or offset spatula: Makes filling the indents neater and easier
Storage and Reheating for Peanut Butter and Jelly Cookies
Room temperature storage: Keep cooled cookies in an airtight container at room temperature for up to 5 days. Place parchment paper between layers to prevent sticking.
Freezing: These cookies freeze beautifully! Freeze in a single layer on a baking sheet until solid, then transfer to a freezer bag or container. They’ll keep for up to 3 months. Thaw at room temperature for about 30 minutes before serving.
Refreshing day-old cookies: Pop them in a 300°F oven for 3 to 5 minutes to restore that just-baked softness.
Make-ahead tip: You can prepare the dough balls, complete with indents, and freeze them unbaked. When ready to bake, add jelly to frozen dough balls and bake straight from frozen, adding 2 to 3 extra minutes to the baking time.
Flavor Variations for Peanut Butter and Jelly Cookies
One of my favorite things about these Peanut Butter and Jelly Cookies is how easily they adapt to different flavor profiles. Here are some creative twists I’ve tried and loved.
Sweet Variations
Chocolate PB&J: Add ⅓ cup mini chocolate chips to the dough before shaping. The combination of chocolate, peanut butter, and jelly is pure magic.
Honey-Sweetened: Replace half the granulated sugar with honey for a more complex sweetness. The dough will be slightly stickier but equally delicious.
Cinnamon Sugar: Roll the dough balls in cinnamon sugar before creating the indent. This adds a warm, spiced element that pairs beautifully with berry jams.
Nutty Upgrade: Fold ¼ cup finely chopped peanuts into the dough for extra crunch and nutty flavor.
Dietary Adaptations for Peanut Butter and Jelly Cookies
Keto-Friendly: Use powdered erythritol in place of sugars and almond flour instead of all-purpose flour. Choose a sugar-free jam.
Paleo: Replace flour with almond flour, use coconut sugar instead of refined sugars, and ensure your peanut butter is natural with no additives. Use fruit-sweetened jam only.
Vegan: Use a flax egg as mentioned earlier, and verify your sugar is vegan-friendly (some brands use bone char in processing).
Global Flavor Twists for Peanut Butter and Jelly Cookies
Inspired by my travels and the diverse flavors I’ve encountered, here are some international variations that work wonderfully:
| Variation | Key Ingredients | Flavor Profile |
|---|---|---|
| Mediterranean | Olive jam or fig preserves | Sophisticated, slightly savory with sweet notes |
| French | Apricot jam + ¼ tsp almond extract | Elegant, fruit-forward, refined |
| Asian-Inspired | Red bean paste or black sesame filling | Earthy, less sweet, unique texture |
| British | Orange marmalade | Bright, citrusy, bittersweet |
| Tropical | Guava or passion fruit jam + lime zest | Tangy, exotic, refreshing |
| Middle Eastern | Date paste + cardamom in dough | Warm spices, caramel notes, rich |
My personal favorite: The Mediterranean version with olive jam creates an unexpected sweet-savory combination that’s absolutely addictive. The brininess of the olives plays beautifully against the sweet peanut butter base. It’s a conversation starter at every gathering!
Serving Suggestions for Peanut Butter and Jelly Cookies
These Peanut Butter and Jelly Cookies are versatile enough for any occasion. Here’s how I like to serve them.
Perfect Pairings
With beverages: Serve alongside cold milk (obviously!), hot coffee, or herbal tea. For adults, pair with dessert wine or a sweet Riesling.
Ice cream sandwiches: Sandwich vanilla or strawberry ice cream between two cookies for an elevated treat.
Dessert platters: Include these cookies on a mixed dessert board with brownies, fruit tarts, and chocolate truffles for variety.
Breakfast twist: Serve with Greek yogurt and fresh berries for a fun weekend breakfast.
Presentation Ideas
For parties: Arrange on a tiered stand with different jelly flavors, creating a rainbow effect. Label each variety with small cards.
Gift giving: Pack in a clear cellophane bag tied with ribbon, or layer in a decorative tin with parchment paper between layers.
Kids’ events: Let children choose their own jelly flavor and watch as you fill and bake their custom cookies.
FAQs About Peanut Butter and Jelly Cookies
Over the years, I’ve received countless questions about this recipe. Here are the most common ones.
Can I use natural peanut butter? I don’t recommend it for this recipe. Natural peanut butter lacks the stabilizers that give these cookies their structure. The oils separate and can make your cookies greasy and overly flat. Save your natural peanut butter for sandwiches and smoothies!
Why did my jelly overflow or burn? This usually happens when you’ve overfilled the indents or used a very thin jelly. Stick to about ½ teaspoon per cookie and choose thicker jams or preserves. If your jelly is runny, chill it first or reduce it slightly on the stovetop to thicken it.
Can I make these without eggs? Absolutely! Use a flax egg (1 tablespoon ground flaxseed mixed with 3 tablespoons water, let sit 5 minutes) or try ¼ cup applesauce. The texture will be slightly different but still delicious.
My cookies spread too much. What went wrong? This could be due to several factors: melted butter (though this recipe doesn’t use butter), dough that’s too warm, or an oven running too hot. Make sure your dough is cool, your oven is properly calibrated, and you’re using the right measurements.
Can I double the recipe? Yes! This recipe doubles and triples beautifully. Just make sure not to overcrowd your baking sheets, and you may need to bake in multiple batches.
Are these cookies safe during pregnancy? The cookies themselves are perfectly safe, as they’re fully cooked. However, if you’re pregnant, avoid any homemade jams that weren’t properly canned or stored, as they could pose a food safety risk. Stick with commercially jarred jams to be safe.
How do I fix overbaked cookies? Unfortunately, you can’t reverse overbaking, but you can salvage dry cookies by storing them in an airtight container with a slice of bread. The bread’s moisture will transfer to the cookies overnight, softening them slightly.
Conclusion
There you have it my perfected recipe for Peanut Butter and Jelly Cookies that bring childhood nostalgia and grown-up flavor together in one chewy, delicious bite. From my kitchen to yours, I hope these cookies bring you as much joy as they’ve brought me and everyone I’ve shared them with.
Fire up your oven and try this recipe tonight! Whether you’re baking solo, with kids, or preparing treats for a gathering, these cookies are guaranteed to disappear fast. The beauty of this recipe is its simplicity and versatility you can make it your own while still achieving that perfect soft, chewy texture every time.
Join the thousands of home cooks in the FoodFansy community who’ve made these cookies their go-to treat. Share your creations with me on social media using #FoodFansyPBJ I love seeing your unique jelly choices and creative variations!
If you enjoyed this recipe, be sure to share it with your friends or save it for later! I’d love to see your unique twist feel free to post your photos on Pinterest!
Peanut Butter and Jelly Cookies – 5-Star Soft & Chewy Recipe
- Total Time: 25 mins
- Yield: 24 cookies 1x
- Diet: Vegetarian
Description
Soft, chewy Peanut Butter and Jelly Cookies with a delightful olive jam twist for a Mediterranean-inspired treat.
Ingredients
1 cup creamy peanut butter
1/2 cup brown sugar
1/2 cup granulated sugar
1 large egg
1 tsp vanilla extract
1 cup all-purpose flour
1/2 tsp baking soda
1/4 tsp salt
1/2 cup jelly or olive jam
Instructions
1. Preheat oven to 350°F (175°C) and line a baking sheet with parchment paper.
2. Mix peanut butter and sugars until creamy.
3. Add the egg and vanilla; mix until smooth.
4. Stir in flour, baking soda, and salt to form dough.
5. Roll dough into 1-inch balls and place on sheet.
6. Press an indent in the center and fill with jelly.
7. Bake for 8–10 minutes until edges are lightly golden.
8. Cool on the baking sheet before transferring to a rack.
Notes
Store in airtight container for up to 5 days.
Freeze for up to 3 months.
Substitute sunflower butter for nut-free option.
- Prep Time: 15 mins
- Cook Time: 10 mins
- Category: Dessert
- Method: Baking
- Cuisine: American, Mediterranean
Nutrition
- Serving Size: 1 cookie
- Calories: 150
- Sugar: 12g
- Sodium: 120mg
- Fat: 8g
- Saturated Fat: 2g
- Unsaturated Fat: 5g
- Trans Fat: 0g
- Carbohydrates: 16g
- Fiber: 1g
- Protein: 4g
- Cholesterol: 10mg
Keywords: Peanut Butter and Jelly Cookies (Soft and Chewy Recipe) – Olives, soft cookies, dessert