

Pumpkin Patch Dirt Cups saved my sanity last Halloween when I had exactly 12 minutes before the doorbell started ringing with costumed trick-or-treaters. There I was, covered in flour from an overly ambitious attempt at spider web cupcakes, when I remembered this brilliantly simple recipe my grandmother used to make for fall festivals.
Here’s my promise: these Pumpkin Patch Dirt Cups deliver maximum spooky charm with minimal effort no baking, no stress, just 7 minutes of assembly time. Each cup looks like a miniature autumn garden, complete with candy pumpkins nestled in chocolate “dirt” that kids and adults alike can’t resist.
As a chef who’s spent years mastering both restaurant-quality dishes and quick family favorites, I’ve learned that the best recipes don’t always require hours in the kitchen. Sometimes, magic happens in moments. This recipe proves that impressive doesn’t have to mean complicated, and that’s exactly the philosophy I bring to every recipe at FoodFansy.
In this guide, you’ll discover why this no-bake dessert works so well for busy schedules, how to choose the perfect ingredients for your dirt cups, step-by-step assembly instructions that even kids can follow, creative variations to match any theme, and answers to common questions about making and serving these adorable treats.
Why This Pumpkin Patch Dirt Cups Recipe Works
There’s something wonderfully freeing about a recipe that delivers big results without demanding your entire afternoon. These Pumpkin Patch Dirt Cups hit that sweet spot between impressive and effortless, making them perfect for last-minute party planning or spontaneous baking with children.
Here’s what makes this recipe a keeper:
- No cooking or baking required – Just assembly, which means zero risk of burning anything or heating up your kitchen on a busy day
- Kid-friendly preparation – Little hands can crush cookies, place pumpkins, and pipe icing, making this a perfect family activity
- Ready in 7 minutes flat – From ingredient gathering to finished product, you’re looking at less time than it takes to brew a pot of coffee
- Budget-conscious ingredients – Four pudding cups and a handful of cookies won’t break the bank, yet the presentation looks bakery-worthy
- Customizable for any skill level – Go simple with just pudding and cookies, or elaborate with piped icing vines and edible grass
- Make-ahead friendly – Assemble these up to 2 hours before serving, giving you flexibility for party planning
The genius lies in the contrast: creamy chocolate pudding against crunchy cookie crumbs, with bursts of sweetness from candy pumpkins. It’s a textural experience that keeps people coming back for more.
Choosing the Right Ingredients for Pumpkin Patch Dirt Cups
The beauty of this recipe is its simplicity, but that doesn’t mean all ingredients are created equal. When you’re working with just four main components, quality matters. Let me walk you through what to look for.
Best Pudding Cups for This Recipe
Pre-made chocolate pudding cups are your foundation here, and texture is everything. I prefer pudding with a thick, mousse-like consistency rather than the thin, runny variety. Brands like Snack Pack or Jell-O work beautifully. If you’re feeling ambitious, homemade chocolate pudding takes this to the next level, but honestly, the convenience of ready-made cups is hard to beat when you’re in a time crunch.
Look for pudding that’s deeply chocolatey in color that rich, dark brown that screams “fresh dirt.” Avoid vanilla or swirled varieties for this recipe; you want that authentic garden patch appearance.
Cookie Selection Tips
Your “dirt” needs the right texture, and not all cookies crush equally. Chocolate sandwich cookies like Oreos create the perfect crumbly consistency. The key is crushing them until they’re fine but not powdery think actual soil texture, not dust.
Pro tip from my kitchen: leave the cream filling in. It adds little specks of white that mimic small stones or roots in real dirt, adding to the realistic effect. For a richer chocolate flavor, consider using chocolate graham crackers or chocolate wafer cookies instead.
Candy Pumpkin Options
Classic orange candy pumpkins (mellowcreme pumpkins) are traditional and adorable, but don’t be afraid to improvise. Orange jelly candies, mini orange gummy bears, or even small orange M&Ms work in a pinch. The goal is something recognizably pumpkin-shaped and orange that won’t sink completely into your pudding.
If you can’t find candy pumpkins, make your own with orange fondant or marzipan it takes an extra few minutes but adds a homemade touch.
Decoration Substitutions
Green icing works perfectly for piping vines, but edible grass (the coconut kind used for Easter baskets) creates an interesting texture contrast. Other alternatives include thinly sliced green fruit leather cut into leaf shapes, fresh mint leaves for a real garden touch, or even green sanding sugar sprinkled over the top.
Ingredients & Prep for Pumpkin Patch Dirt Cups
Let me break down exactly what you need and how to prep each component for maximum efficiency. Organization is the secret to hitting that 7-minute mark.
Pudding Prep Essentials
Start with 4 chocolate pudding cups at room temperature or slightly chilled. Open each cup and give the pudding a quick stir with a spoon to smooth out any separation that may have occurred during storage. This ensures a silky, even surface for your dirt layer.
If you’re making pudding from scratch, prepare it at least 2 hours ahead so it has time to set properly. Homemade pudding should be thick enough to support cookie crumbs without getting soggy.
Cookie Crushing Technique
For 8 chocolate sandwich cookies, you have several crushing methods. My favorite is the zip-top bag method: seal cookies in a gallon freezer bag, press out excess air, and use a rolling pin or the bottom of a heavy glass to crush them. Roll and press until you achieve a crumbly, sand-like texture.
Alternatively, pulse cookies in a food processor for 5-10 seconds. Be careful not to over-process, or you’ll end up with powder instead of crumbs. You want pieces ranging from fine crumbs to small pea-sized chunks for visual interest.
Decoration Preparation
If using green icing for vines, transfer it to a piping bag or small zip-top bag with a tiny corner snipped off. Practice a quick swirl on parchment paper to get comfortable with the pressure and flow.
Candy pumpkins need no prep, but having them lined up and ready speeds up assembly. If you’re adding edible grass, separate the strands slightly so they look more natural when placed.
Assembly Station Setup
Arrange your workspace with pudding cups in a row, crushed cookies in a bowl with a spoon, candy pumpkins within easy reach, and your icing bag ready. This production-line approach lets you assemble all four cups quickly and consistently.

Step-by-Step Cooking Instructions for Pumpkin Patch Dirt Cups
One of the things I love most about teaching cooking is showing people that impressive results don’t always require complicated techniques. This recipe is proof. Let’s walk through each step together.
Pre-Cooking Prep: Pumpkin Patch Dirt Cups
The term “pre-cooking” is generous here since there’s no actual cooking involved, but preparation sets you up for success. Gather all your ingredients and arrange them on your counter or workspace. Open your pudding cups and set them on a stable surface where they won’t tip.
Give each pudding cup a gentle stir to eliminate any film or separation on top. This creates a smooth canvas for your cookie crumbs. If your pudding seems too thick, you can add a tiny splash of milk and stir it in, but this is rarely necessary with pre-made cups.
Room temperature is ideal for assembly. Pudding that’s too cold can cause condensation, making your cookie crumbs soggy prematurely.
Assembly Method: Pumpkin Patch Dirt Cups
Now for the fun part. Take your crushed cookies and spoon a generous layer over the top of each pudding cup, covering the chocolate surface completely. I use about 2 tablespoons per cup, but you can adjust based on how “dirty” you want your patches to look. Pat the crumbs down gently with the back of your spoon to help them adhere.
Press 2 candy pumpkins gently into the cookie crumbs on each cup, positioning them so they look like pumpkins growing from the soil. Push them in just far enough that they stay put but still remain visible you want them peeking out, not buried.
If you’re using green icing, pipe small squiggly lines from the base of each pumpkin outward to resemble vines creeping across the dirt. Keep the lines thin and organic-looking. For edible grass, pinch small amounts and press them around the pumpkins like sprouting vegetation.
The entire assembly process takes about 90 seconds per cup once you get into a rhythm.
Presentation: Pumpkin Patch Dirt Cups
These cups are beautiful as-is, but presentation elevates them from snack to centerpiece. Serve immediately for the crunchiest texture, or refrigerate for up to 2 hours if you need to make them ahead. Chilling firms up the pudding slightly and helps the flavors meld.
For parties, arrange the cups on a rustic wooden board or autumn-themed platter. Add scattered candy corn, small decorative pumpkins, or fall leaves around the base for extra visual impact.
If you’re serving these to kids, consider placing each cup in a small clear plastic cup or mason jar for easier handling and less mess. The layered effect looks especially charming through glass.
Pro Tips for Perfect Pumpkin Patch Dirt Cups
After making countless batches of these over the years for school parties, Halloween gatherings, and fall festivals, I’ve picked up a few tricks that make all the difference.
Avoiding Soggy Dirt
The biggest complaint I hear about dirt cup recipes is soggy cookie crumbs. The solution is timing and technique. Add your cookie layer no more than 2 hours before serving, and make sure your pudding isn’t overly wet or warm when you assemble. If you must make these further in advance, keep the crushed cookies separate and add them just before serving.
Another trick: use a double layer of cookies. Put down a thin first layer, let it set for 5 minutes, then add a second layer right before serving. The bottom layer forms a slight barrier while the top stays crunchy.
Tool Recommendations for Pumpkin Patch Dirt Cups
While this recipe is beautifully low-tech, a few tools make life easier. A pastry bag with a small round tip gives you the most control for piping vines, though a zip-top bag works fine in a pinch. A small offset spatula helps smooth pudding if you’re particular about presentation.
For crushing cookies, I swear by the zip-top bag method, but if you’re making these regularly, a food processor saves time. Just pulse carefully to avoid powder.
Storage & Reheating for Pumpkin Patch Dirt Cups
These dirt cups are best enjoyed fresh, but they’ll keep covered in the refrigerator for up to 24 hours. The cookie crumbs will soften over time, so factor that into your planning. There’s no reheating necessary since this is a chilled dessert.
If you’re transporting these to a party, keep them in a shallow container with a lid, and bring extra crushed cookies to sprinkle on top right before serving if the originals have gotten soft.
Making in Bulk
Need to make 20 dirt cups for a classroom party? Set up an assembly line. Prepare all pudding cups first, then do all the cookie layers, then all the pumpkin placements, then all the decorations. This production method is faster than completing one cup at a time when you’re working in volume.
Flavor Variations for Pumpkin Patch Dirt Cups
One of my favorite things about this recipe is how easily it adapts to different themes and dietary needs. The basic concept is so versatile that you can spin it dozens of ways.
Spooky Halloween Twist
Swap candy pumpkins for gummy worms peeking out of the dirt, add candy eyeballs scattered across the surface, or use green pudding (mix vanilla pudding with green food coloring) for a “toxic waste” effect. Crushed chocolate cookies still work, but you could also use crushed Oreos with orange cream filling for extra Halloween spirit.
For a truly spooky presentation, rim the cups with red decorating gel to look like blood, or add white chocolate “bones” made from pretzel sticks.
Dietary-Friendly Options
For gluten-free guests, use gluten-free chocolate sandwich cookies several brands make excellent versions. Sugar-free pudding and sugar-free cookies work for diabetic-friendly versions, though the texture may be slightly different.
Vegan dirt cups are totally doable: use plant-based chocolate pudding (So Delicious makes a great one) and vegan sandwich cookies like Newman-Os. The candy pumpkins are usually gelatin-free, but check labels to be sure.
Seasonal Themes Beyond Fall
This concept works year-round with simple swaps. For spring, use vanilla pudding, crushed vanilla wafers for “sand,” and place jelly beans or Peeps as flowers. Summer versions could feature blue pudding for “water,” crushed graham crackers for “beach sand,” and Swedish Fish candy.
Christmas dirt cups use white pudding or crushed peppermint cookies for “snow,” with red and green M&Ms as ornaments. The possibilities are endless once you start thinking about the basic template.
Global Flavor Inspirations
For a Mexican-inspired version, use chocolate pudding spiced with cinnamon and cayenne, crushed churros instead of cookies, and drizzle with dulce de leche. An Italian twist might feature espresso-infused pudding with crushed biscotti and chocolate-covered espresso beans on top.
Asian-inspired dirt cups could use black sesame pudding, crushed sesame cookies, and mochi pieces for decoration. Don’t be afraid to experiment the dirt cup format is more flexible than you might think.
| Variation | Pudding Base | “Dirt” Layer | Decorations | Best For |
|---|---|---|---|---|
| Classic Pumpkin Patch | Chocolate pudding | Crushed Oreos | Candy pumpkins, green icing | Fall parties, Halloween |
| Spooky Graveyard | Chocolate pudding | Crushed chocolate wafers | Gummy worms, candy bones | Halloween night |
| Spring Garden | Vanilla pudding | Crushed vanilla wafers | Jelly bean flowers, mint leaves | Easter, spring celebrations |
| Beach Scene | Vanilla or banana pudding | Crushed graham crackers | Swedish Fish, blue jello “water” | Summer parties, beach themes |
| Winter Wonderland | White chocolate pudding | Crushed peppermint cookies | Red/green M&Ms, white sprinkles | Christmas, winter gatherings |
| Gluten-Free | GF chocolate pudding | Crushed GF chocolate cookies | Any candy (check labels) | Dietary restrictions |
| Vegan Friendly | Plant-based chocolate pudding | Crushed vegan cookies | Gelatin-free candies | Vegan guests |
Serving Suggestions for Pumpkin Patch Dirt Cups
Presentation is where you can really let your creativity shine. These little cups are adorable on their own, but the right serving context takes them from good to unforgettable.
Pairing with Fall Treats
Serve Pumpkin Patch Dirt Cups alongside other autumn favorites for a complete seasonal spread. They pair beautifully with apple cider, caramel popcorn, pumpkin bread, or cheese and crackers for adults. The rich chocolate pudding balances nicely against tart apple flavors or sharp cheddar.
For a kids’ party, create a dessert table with these dirt cups, candy corn, pretzel broomsticks, and orange punch. The variety keeps children entertained while the dirt cups serve as the centerpiece.
Beverage Pairings for Pumpkin Patch Dirt Cups
Adults will appreciate these dirt cups with spiced coffee, chai lattes, or hot apple cider. The warm spices complement the chocolate beautifully. For evening gatherings, try pairing with dessert wines like port or a chocolate stout beer.
For family-friendly occasions, serve with cold milk (classic and comforting), hot chocolate for a double-chocolate experience, or sparkling apple cider for something festive.
Creative Presentation Ideas
Move beyond traditional serving by arranging dirt cups in a shallow basket lined with raffia or straw for a harvest theme. Nestle them among small decorative pumpkins, pinecones, and autumn leaves for an Instagram-worthy display.
For individual place settings, set one dirt cup at each seat with a personalized name flag stuck in the “dirt” use small wooden picks with paper flags. Kids especially love finding their names in the pumpkin patch.
FAQs About Pumpkin Patch Dirt Cups
Over the years at FoodFansy, I’ve received countless questions about making these simple but beloved treats. Here are the answers to the most common ones.
Can I use homemade pudding instead of store-bought for Pumpkin Patch Dirt Cups?
Absolutely! Homemade chocolate pudding actually works wonderfully and adds a richer, more sophisticated flavor. Just make sure it’s thick enough to support the cookie crumbs without getting soggy. Prepare it at least 2-3 hours ahead so it has time to chill and set properly. The ratio stays the same: just top each cup with crushed cookies and decorations as directed.
How far in advance can I make Pumpkin Patch Dirt Cups?
You can make these up to 2 hours before serving for optimal texture. If you need more advance prep time, assemble the pudding cups and prepare your crushed cookies separately, then add the cookie “dirt” layer just before serving. The pudding cups themselves can be refrigerated for up to 24 hours, but the cookies will soften significantly if added too early.
What if I can’t find candy pumpkins for this recipe?
No problem! Orange jelly candies work great, as do orange M&Ms, small orange gummy bears, or even cubes of orange fruit leather. You could also make your own decorations from orange fondant or marzipan. For a non-traditional approach, use any seasonal candy that fits your theme candy corn, chocolate leaves, or even fresh raspberries for a garden look.
Are Pumpkin Patch Dirt Cups safe for young children?
Yes, this recipe is kid-friendly and safe for young children, though adult supervision is recommended during preparation if children are helping. The ingredients are all soft and easy to eat. However, be mindful of small candy pieces that might pose a choking hazard for very young children under 3. You can always use larger decorations or skip them entirely for toddlers.
Can I make a larger batch in one serving bowl instead of individual cups?
Definitely! This recipe scales beautifully. Use a trifle bowl or large serving dish, layer pudding and crushed cookies, and decorate the top with candy pumpkins and icing. It becomes more of a “dirt cake” presentation but tastes just as delicious. Just keep in mind that individual cups are easier for parties since guests can grab and go without needing plates and spoons.
How do I keep the cookie crumbs from getting soggy in Pumpkin Patch Dirt Cups?
The key is timing and proper pudding consistency. Add cookie crumbs no more than 2 hours before serving, and make sure your pudding isn’t too warm or liquidy. If you must make these further ahead, store crushed cookies separately and sprinkle them on just before serving. Another trick is to add a thin layer of cookies, let them set for a few minutes, then add a fresh layer on top right before service.
What’s the best way to transport these to a party?
Place dirt cups in a sturdy, shallow container with a lid, making sure they fit snugly so they don’t slide around. You can also place them in a muffin tin for stability during transport. Bring extra crushed cookies and decorations separately, then add a fresh top layer when you arrive. This ensures maximum crunchiness and visual appeal.
Can I make these dairy-free for guests with allergies?
Yes! Use dairy-free pudding cups (brands like So Delicious or Silk make excellent options) and ensure your cookies are dairy-free (many chocolate sandwich cookies surprisingly are, but always check labels). Candy pumpkins are typically dairy-free, but verify if you’re serving someone with severe allergies. The recipe works exactly the same way with these substitutions.
Conclusion
There you have it your complete guide to creating Pumpkin Patch Dirt Cups that bring smiles, spark conversations, and make autumn entertaining effortlessly charming. This 7-minute wonder has saved me countless times when I needed something festive fast, and I know it’ll become one of your go-to recipes too.
If you enjoyed this recipe, be sure to share it with your friends or save it for later! I’d love to see your unique twist feel free to post your photos on Pinterest!
Emeli
Print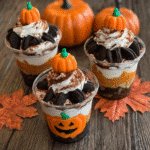
Pumpkin Patch Dirt Cups – 7-Min Easy & Spooky Dessert Fun
- Total Time: 7
- Yield: 4 1x
- Diet: Vegetarian
Description
These adorable Pumpkin Patch Dirt Cups are a no-bake Halloween dessert that takes just 7 minutes to make! Featuring chocolate pudding topped with crushed cookie ‘dirt’ and cute candy pumpkins, they’re perfect for fall parties, Halloween celebrations, or fun family activities. Kids love helping make these spooky treats!
Ingredients
4 chocolate pudding cups (3.5 oz each)
8 chocolate sandwich cookies (such as Oreos)
8 candy pumpkins (or orange jelly candies)
2 tablespoons green icing (or edible grass for decoration)
Optional: extra candy corn or autumn sprinkles for garnish
Instructions
1. Open the chocolate pudding cups and give each one a gentle stir with a spoon to create a smooth, even surface.
2. Place the 8 chocolate sandwich cookies in a zip-top bag, seal it, and crush them with a rolling pin until they form fine, crumbly pieces that resemble dirt.
3. Spoon approximately 2 tablespoons of crushed cookie crumbs over the top of each pudding cup, covering the chocolate surface completely to create the “dirt” layer.
4. Gently press 2 candy pumpkins into the cookie crumbs on each cup, positioning them so they look like pumpkins growing from a garden patch.
5. Using a piping bag or zip-top bag with a small corner cut off, pipe thin squiggly lines of green icing from the base of each pumpkin to resemble vines (or sprinkle edible grass around the pumpkins).
6. Serve immediately for the crunchiest texture, or refrigerate for up to 2 hours before serving for a firmer consistency.
Notes
Make-Ahead Tip: Prepare pudding cups and crushed cookies separately, then assemble just before serving to keep cookie crumbs crunchy.
Storage: These dirt cups will keep covered in the refrigerator for up to 24 hours, but cookie crumbs will soften over time.
Substitutions: Use homemade chocolate pudding for a richer flavor, or swap candy pumpkins with any seasonal candy like gummy worms or candy corn.
Dietary Options: For gluten-free guests, use GF chocolate sandwich cookies. For vegan versions, use plant-based pudding and vegan cookies.
Kid-Friendly Activity: This is an excellent recipe for children to help with—they can crush cookies, place pumpkins, and decorate the cups.
Bulk Preparation: To make 12-20 cups for parties, set up an assembly line doing one step at a time across all cups for efficiency.
- Prep Time: 5
- Category: Dessert
- Method: No-Bake
- Cuisine: American
Nutrition
- Serving Size: 1 cup
- Calories: 245
- Sugar: 28g
- Sodium: 180mg
- Fat: 9g
- Saturated Fat: 3g
- Unsaturated Fat: 5g
- Trans Fat: 0g
- Carbohydrates: 38g
- Fiber: 2g
- Protein: 4g
- Cholesterol: 5mg
Keywords: pumpkin patch dirt cups, no bake halloween dessert, chocolate pudding cups, dirt cake cups, halloween treats for kids, fall dessert recipe, easy halloween recipe, 7 minute dessert, candy pumpkin recipe, no bake dirt cups